Dougall Photography
  • Home
  • Stock Photography
  • Tips and Trips
  • Photos

What Camera Gear to Take on an Alaskan Cruise

6/14/2010

 
Picture
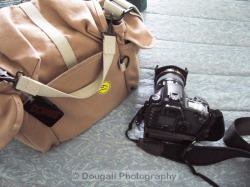
When it comes to carrying photo gear on an Alaskan cruise I do a pretty good imitation of a Sherpa with the amount of stuff I pack.  I try to balance what I want to bring with what I am willing to carry but sometimes that balance is difficult to achieve.  For many cruise passengers an Alaskan cruise is a once in a lifetime thing and they don't want to miss any photo opportunities by not having the right gear. 

The trouble is, if you try to bring everything you think you need, you are going to wind up carrying too much gear and regret having to move it around.  I started going to Alaska with lenses ranging from 16mm to 800mm, some of which I used a great deal and some of which I didn't use at all.  I have limited myself now to three lenses - a wide angle to normal zoom lens, a short to long telephoto zoom and one fast prime.  I supplement the long telephoto with a 2X extender and have been able to capture everything I need to with this range of lenses.

The choices I make for gear may not be the right ones for you, but I would pay attention to the "Dougall Tour Size Theorem" which states that the larger the tour group, the shorter the lens you should bring along.  As an example, 60 people in a tour bus means that you really are not going to be stalking wildlife to any degree and swinging an 800mm lens in close quarters is going to be a dangerous exercise.  On the other hand, six of you in a Land Rover where you can get out and perhaps encounter wildlife may call for unleashing that behemoth lens in the open.

Everything I take to Alaska goes into a Think Tank "Airport Antidote" backpack.  The two advantages to this backpack are that it holds all the gear I want to use (or carry) and it will fit under the seat of the small flying culverts that pass for airplanes flying in and out of Saskatoon.

My cameras are full frame and 1.3 crop, so I use lenses that work with these bodies.  If you are using a 1.6 crop camera, you will want to convert these lens choices into equivalent ranges suitable for your camera.

So, into the Think Tank backpack I place the following:

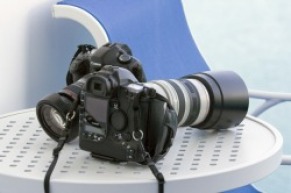
Canon 5D Mk II with battery pack and 24 - 105 f/4 lens: as a landscape and street photographer, this camera and lens combination is the one I use 80% of the time.  It works great for most landscape images, in town situations, and even wildlife if it is close enough.
Canon 1D Mk III w/o lens: my wildlife/high speed camera.  A 1.3 crop camera but a speed demon that almost instantaneously locks focus on just about anything you point it at.
Canon 70- 200 f/2.8 IS lens: a very sharp and versatile lens that, in combination with the 2X extender (yes, there is a small drop in image quality when you use the extender) makes it more useful to me than my previous 100-400 lens.  I simply love the f/2.8 aperture of this lens as it can be quite dark at times in Alaska
Canon 2X extender: for the 70-200 lens
Canon 50mm f/1.4 lens: really, any fast prime lens will do for those times when it is too dark/cloudy to shoot with any other lens.  Any other fast prime lens could be substituted here and I have taken a 35 f/1.4 on occasion instead.
Canon Speedlite 270EX: the smallest flash that Canon currently makes and useful only for close-up fill flash.  Hey, I shoot outdoors 99% of the time and have to think about how to use a flash every time I take it out  :-)  A huge Speedlite would be a waste for me to carry.  If you are a big user of  flash, throw that Speedlite 580 in!
Canon 10X30 IS binoculars:
more reach, less shake.  I am in love with these binoculars and an Alaska cruise cries out for a set to be brought along.  With Canon's image stabilization technology, these are easy to hold and look through.
SONY Vaio 10" Netbook:  this is where I backup my images to and store the GPS data I collect as I shoot.  If you don't shoot a great deal you can just bring memory cards along and burn the images to CD's on the ship or at Internet Cafes you find along the way.
500G external hard drive: my netbook only has a 250G hard drive so it won't hold two week's worth of images.
JOBO GPS: Canon does not have a GPS solution at the moment so I use this device to mark each image with GPS data.  As the JOBO does not hold very many data points, I need to download the data (and photos) to my netbook, erase the data from the JOBO GPS and start again.
Various chargers, filters, brushes and cleaners: I wish I didn't have to use all the space for this stuff, but it is important to have along.

I often also carry a small "digital derringer" such as a Canon S90 for times when I don't want to schlep the heavy gear around.

The way to manage all this once I am on the ship is to bring along a DOMKE F-4AF for daily use.  As the DOMKE is essentially a canvas bag, it folds flat into my suitcase and can be reconstituted upon arrival on our ship.  This serves as my day bag, holding one of my cameras with a short lens as well as the 70-200 in another compartment.  The outside pockets can hold accessories or bottles of water.

I have both a Lowe-Pro neoprene neck strap and E-1 hand strap on both cameras.  While I like the neck strap as it stretches and gives a bit when I have the camera around my neck, I usually carry my camera by the hand strap.  It is much easier for me to carry a heavy camera and lens off the end of my hand as opposed to around my neck.  It also makes the DOMKE weigh a lot less as I carry it over my shoulder.

Think about what you really need on a cruise and try to leave the rest behind; your back and neck will thank you for it!  During our seminars we will help you with any of the equipment you bring along.  Whether it is a small digital camera or a full SLR with extra lenses, we are there to help you in any way we can.

10 Things You Have To Photograph In Southeast Alaska!

6/3/2010

4 Comments

 
Glacier Bay, Alaska
Glacier Bay, Alaska
Alaska is a land of beauty and wonder.  Every place you turn there is something to take your breath away - whether it is a snow capped mountain or the price of a latte on your cruise ship.  Friends and family who are about to cruise to Alaska for the first time often ask what are the things they shouldn't miss on their trip.  Trouble is, with literally a thousand experiences to be had, it's difficult to choose, but choose we have done.  Don't expect the usual tours and trips that you are likely to encounter, instead this is a very personal  top ten list of things to see and photography between Ketchikan in the south and Hubbard Glacier in the north.  

You will notice that this is a list of land and sea photo opportunities.  It's not that flightseeing isn't spectacular, but I have never taken one and have no experiences to report on.  As someone who has lived in the north, I don't fly in small planes with pilots I haven't known for years - it's just a thing I have. 

1. Totem Bight State Park, Ketchikan: beginning in 1938, a collection of totem poles has grown on this beautiful spit of land overlooking the Tongass Narrows.  Today there are 14 totem poles stand here along with a traditional Tlingit clanhouse.  Given the beautiful setting and wonderful native artifacts, it's a place to happily spend a few hours.  As a bonus, the Potlatch Totem Park is within easy walking distance and displays modern totem poles and other Tlingit buildings carved by local artisans working on the site.

2. Creek Street Historic District, Ketchikan:
 what was once the red light district of town is now home to shops, restaurants, apartments and bed and breakfast establishments.  The boardwalk, running along Ketchikan Street, offers numerous photo opportunities as both meander from Dock to Stedman Streets.   A funicular runs from about the middle of Creek Street up to Cape Fox Lodge where the views are worth the few dollar cost of the ride.  Consider walking down "Married Men's Trail" back to Creek Street once you have had a look around.

3. Whale Watching, Juneau:
while there are several ports where you can go whale watching, the tours leaving out of Auke Bay in Juneau usually spot whales somewhere in their travels.  In addition, there will always be sea lions hauled out on a navigation buoy that the tour ship passes by.  Most tour boats also stop in front of Point Retreat Lighthouse which has been recently restored by the Alaska Lighthouse Association.

4. Mendenhall Glacier Hiking Trail, Juneau
: for those who want to strike out on their own, taking the Blue MGT shuttle bus from the cruise dock to the Mendenhall Glacer means you have time to explore on your own.  Eschew the paved tourist trails and head off on the East Glacier Trail Loop (2 - 3hrs) which winds through old growth forest and past waterfalls and streams.  The West Glacier Trail Loop (2 - 5hrs) will take you right up to the face of the glacier.  Return to port on the same MGT shuttle you came out on. 

5. Ship Registry, Skagway:
on the eastern side of the Railway Dock in Skagway there are paintings of ship crests and names commemorating the first arrival of ships to Skagway as far back as 1917.  Once you have ridden the railway to the Yukon or explored downtown Skagway, take a few minutes to check out this impressive artwork on the cliff face.

6. Sea Otter Rafts, Sitka:
for a small port, there is a great deal to do in Sitka.  This is the place to take a marine tour if you want to see large numbers of sea otters floating together in rafts.  Chances are you will also see sea lions, seals and perhaps some whales as well. 

7. Totem Poles in Sitka National Historic Park, Sitka:
 fifteen totem poles are displayed in old growth forest around the park visitors' centre.  The paths are level and clear making this park easy to explore.  There is a visitor center where various artists practice wood carving that tourists can watch. As walk through the park will also take you to the Alaska Raptor Center to see a diverse collection of captive and recovering raptors from around North America. 

8. Glacier Bay National Park and Preserve:
it takes most of the day to make the stately run in from the mouth of Glacier Bay to the Grand Pacific Glacier at the north end of the park.  With the Margerie Glacier right next to the Grand Pacific, ships stop and slowly rotate for an hour or so for passengers to view the two large cliffs of ice.  On the way out, many ships make a side trip to view Lamplugh Glacier for a few minutes.  Marine mammals can often to seen along the way with harbor seals near the glaciers and whales near the entrance to the bay.

9. Hubbard Glacier, Yakutat Bay:
Yakutat Bay is home to the Hubbard Glacier which is about 30 miles past the entrance to the bay.  Hubbard is three miles wide, so you better start taking pictures early if you want to get all of this glacier in!  Hubbard is so large that it creates its own weather with a cold wind blowing off the ice until you are almost in front of the glacier.  Cruise captains, while always erring on the side of caution, like to boast to other captains about how close they were able to get their ship to the glacier.  Hope for clear water with very little floating ice if you expect to get in close! 

10. Tidal walks, Icy Strait Point:
  Icy Strait Point promises you the "Real Alaskan Experience" and as you arrive on shore via your ship's tender, you will see that you are not in a city port.  Heading out behind the Cannery Museum the clearly marked hiking trails will lead you into the rain forest and along the shore where the clear ocean water reveals an abundance of sea life just off shore.

This post is open for comments so feel free to add other "must sees" or challenge my choices.

4 Comments

Focus on the Foreground

5/31/2010

 
Celebrity Millenium in Port
Celebrity Millennium in Port
Updated May 2013

Cruising places you in parts of the world where the spectacular scenery seems to go on forever and challenges the photographer to create an image that maintains some of the "depth" of the scene in two dimensions.  There are many ways to achieve this depth, one of which is to literally focus on the foreground to give a sense of proximity for the viewer.  Sometimes this is best achieved with a wide angle lens as outlined below.

Wide angle photographs can be quite dramatic with the perspective they offer but they can take in so much that there is no impact whatsoever.  Personally, I love how much of an image you can render sharply with a wide angle lens and a small aperture.

The image to the left is the classic shot of a cruise ship in port.  As these things are huge, you have to get back a ways if you ever hope to get a recognizable amount of the ship into a photo.  While on shore looking for a "beauty shot" of our ship, I was walking towards the bow where I could see that it was tied to massive yellow cleats that were mounted right on the pier.  Selecting 24mm on my zoom lens and f/13 on my camera, I was able to take a picture with considerable depth of field from the cleat to the bow off the ship.  The bold yellow adds interest to the foreground and the nylon lines draw the viewer's eye up to the ship.

Placing leading lines in an image helps balance things in the foreground and background.  They also help to guide the viewer from one portion of the photo to another.  Leading lines may move up into a picture or across it, but an image is often stronger when connections are made between various picture elements.

Cartagena Tug Boat
Cartagena Tug Boat
Here I was trying to capture the huge expanse of white skyscrapers in Cartagena, Colombia but I was struggling with the usual property of a wide angle lens as it turns mountains into bumps and skyscrapers into bungalows.  Cruise ships pass quite close to Bocagrande on their run into the port which provides up-close images of some of the city's buildings.  Unfortunately, by the time the full width of the Cartagena skyline is visible, you are so far away that you have to decide: wide angle for the entire cityscape or telephoto for a much narrower, but more detailed image.

I also had the option of trying a fast and dirty panorama shot with a telephoto lens, but the ship was moving and the speed of my Canon 5D Mk II in taking multiple images is best measured with a calendar.  So, as I stared at the scene deciding what do, a tug boat slipped around the stern of our ship and pulled up alongside to shepherd us to the pier just in case the captain had some kind of seizure in the last 1/4 mile of our journey.  While this made me significantly more at ease, it also placed a colorful picture element smack dab in the foreground.  Now with the tugboat to draw the viewer's attention, I thought I could use the wide angle to capture this image.

No sight lines in this image, but a bright picture element to balance and fill the foreground.

From May 23 until May 30, we will be holding a giveaway for one of David Duchemin's wonderful ebook "A Deeper Frame".  This is a very engaging look at how to bring depth and presence to your photos in simple and effective ways.  Live a comment here (you need to leave an email address for us to contact you if you win but is is hidden and we don't use or sell your email addresses) and hit the retweet button on this page and you are in.  Winner announced her on May 30.

A Change of Perspective

5/28/2010

 
Picture
Canal View of Church on Spilled Blood
One of the challenges for photographers who travel is finding the "new view" of a place that has been shot countless times by thousands of visiting photographers.  The wide view, the long view, the close up view of every tourist attraction have all been done by passing photographers and those who live close by.  The challenge for us is finding the time and knowledge to capture a different and fresh interpretation. 

The photo to the left is of the Church of the Savior on Spilled Blood, taken from the Italian Bridge over the Griboedov Canal in St. Petersburg.  This is one of the regular tourist stops for photos of this magnificent church.  The church, built between 1883 and 1907, is officially known as The Resurrection of Christ Church and was constructed on the spot that Alexander II was assassinated in 1881.  Many tourists photograph the church from this vantage point and if  you are travelling with a group tour, this may be the only "at a distance" view you will have the opportunity to get.

Picture
If you are travelling on your own, or with a knowledgeable guide, you would have the time to walk 400 meters north east of the church to the Field of Mars.  This former parade ground is now a national war memorial and, in the early morning, is devoid of people.

We were lucky enough to be exploring St. Petersburg with a guide and driver and on the way past the Field of Mars we saw this view of the Church on Spilled Blood.  Screeching to a halt on a busy road, Jan and I rolled out of the car and headed across the park.  The angle from there produced a far more pastoral view of the church with trees and grass rather than streets and buildings.  Jan and I spent some time moving around the park looking for the best vantage point. 

As usual, I used a 24-105 lens while Jan used her favourite 70-300 zoom.  Her pictures are my favourites of that day.  She was able to frame the church with leaves around the image, giving it a more intimate view than my pictures that included more of the park and sky.  Buyers prefer her image as well as it sells many times more often on iStock than mine do.

Picture
View from Canal
Sometimes we can't leave a group or have the luxury of our own driver and guide to find shooting locations for us.  All is not lost though, in a search for a different view .  While this could have been shot laying on the road outside the church, given the driving habits of most Russians, I wouldn't recommend it.  This was taken from an even lower angle on a canal tour boat passing by the church.  I was able to accomplish two things with this shot:  isolate the church from a cluttered background by selecting only a part of it and, create an image taken from an unusual angle.

As I said in our posting about Photography On Sea Days, looking up often will produce a pleasing angle and photo.  Sometimes you also need to Get Up Close and Personal with your subject to eliminate the clutter that may surround it.  As you encounter locations in your travels that have been photographed a hundred times, take one of two options - move back and around to find a view that includes something new and different in the foreground, or get up close and personal and find the details.  If you have the time and flexibility, try both!

These are some of the techniques that we will be practicing during our upcoming photo seminars to bring interest and impact to your photos.  We would be happy to explore Alaska with you and your camera!

Shoot the Sun

5/26/2010

 
Dawn in St. Petersburg Harbor
Landscape photographers tend to be a sad lot.  They are in bed once there is no longer any usable light so they can be up prowling around before dawn to catch the first light of day. One of the things I love about cruise ships is they often arrive in port early in the morning and, given the height of the decks, the ship makes an excellent shooting platform providing a perspective that is often not possible to catch from ground level.  I love how silently such a large vessel glides slowly into port as if it was floating on air rather than plying its way through water.  Every chance we get we are out on deck or our balcony to be part of the majestic arrival of our ship.  There is no other means of transportation that is as slow and silent as the arrival of a ship in port and this is one of the reasons we love the experience so much - there is a slow motion dignity to this means of transport that is missing in our usual frenetic transit from place to place.

Landscape photographers work hard to avoid shooting into the sun on a regular basis as it can, without filters and careful consideration, wash out colors and make the correct capture of highlights and shadows almost impossible.  If you are willing to shoot at dawn or dusk when the sky is often saturated with color, shooting into the sun can create dramatic images. 

The silhouetted industrial cranes to the left were shot about 5:30am as we arrived in the harbor at St. Petersburg, Russia.  The shot was directly into the sun and I knew that by exposing for the sky I would get the orange light of  morning and the shadows would block up giving only the outlines of the cranes.  This also served to hide most of the industrial detritus scattered around this working port. 

Silhouettes work for the same reason that black and white images do - they strip away most of the color and let the viewer focus on the shapes and forms in the image.  The cranes stand out against the orange sky as there is very little additional detail in the image.  If this had been shot in the cold light of day, the cranes would just be part of the industrial machinery on display in port.

Kids at the Aquarium
While you can't see the sun directly in this image, the light blue behind the aquarium glass is the result of sunlight on the water's surface.  Once again, by exposing for the lightest part of the image, the darker parts become silhouetted and there is a distinct loss of details in the children.  This draws the viewer's attention to the Beluga Whale in the background and the children's arms pointed towards the whale.

This silhouette technique is relatively easy to achieve with most cameras as you simply let the camera go about its usual work when you point it at something bright - it will properly expose the brightest part of the image and throw the rest into shadow.  Sometimes you may have to brace you camera against something solid because the light, even in the brightest part of the image, can be quite dim.  Avoid the "shakes" by bumping up your ISO or finding something solid to steady the camera on.

Photography On Sea Days

5/25/2010

 
Picture
Cruise Ship Superstructure
Photographers are rarely bored. While others go ashore looking to shop or tour a museum, hardcore photographers look instead for interesting architecture, beautiful natural formations or a juxtaposition of color, shape or texture.  This means we also tend to prowl the ship on sea days looking for ways to represent the look and feel of the ship.  A ship is very much like most tourist attractions - they have been photographed a hundred times in a hundred different ways.  The challenge is to capture something different that still represents the ship.

My suggestion is to look for details and for patterns.  That sometimes means looking up, rather than out.  Most cruise guests stand at the railing of the ship and photograph the scenery (or water) that is off to the side of the ship.  Less often do we stop and look up to see if there are any interesting shapes.  The shot to the left was taken on Celebrity Millennium from the Sunrise Deck looking up at the cover over the AquaSpa.  I like the play between the white superstructure and the blue sky in the background.  I wanted to isolate the curve of the roof so that the viewer would be drawn to the shape itself.  The image reminds me of our last cruise and is an interesting study in shape and color for people who don't know that it is part of a cruise ship.

Picture
Sail Away Flags
A more obvious shot of a cruise ship but still one that requires looking up and isolating a part of the vessel.  The sail away flags give the clue that this is a ship and not some industrial structure somewhere.  Having the sail away flags in the image helps to establish this as a shot at the beginning of a cruise and could serve nicely as an opening image in a slide show done in Photo Story 3 or iPhoto.

When you have some time on board your ship, see if there are shapes, colors and textures that you can isolate in your photos.  The end results can be engaging both for you and others who see your photos later.  Remember, less is sometimes more when it comes to photography.

Collecting Old Soviet Cameras

5/22/2010

4 Comments

 
Picture
Russian Cameras
Someone once said that having two of something is a happy accident, three of the same thing is a collection and four or more is some form of obsession.  I suspect that makes me obsessive is some way as I not only use cameras on a daily basis, I also collect them.  Not just any "them" though, but cameras that were manufactured in the former Soviet Union and dependents such as East Germany.

Many of these cameras are not functional and have never been.  The managed economy of the Soviet Union required factories to fulfil monthly production quotas of things that looked like cameras - whether they worked or not was immaterial.  This is particularly true of my Zenit 16 produced between 1973 and 1977 by the KMZ factory owned by the Soviet Ministry of Defence.  While rare today, it was produced in sufficient number and without any quality control for many original owners to return them for replacement or, as some stories go, to just throw them against the side of the store that sold them in Moscow.

The Soviet-era camera makers played fast and loose with the designs of other western manufacturers.  The production of a Salyut-C, looking suspiciously like a Hasselblad 1600F,  has earned this camera the nickname "Hasselbladski" but not the reputation for reliability of the Swedish camera..

Early FED cameras were more reliable and almost exact copies of German Leica cameras.  These cameras were produced between WWI and WWII in what amounted to an orphanage, run by the Soviet secret police, that had previously produced furniture and electric drills. 

Cameras are fascinating as examples of industrial engineering that are often, like fine watches, at the pinnacle of design principles and craftsmanship.  Today almost all film cameras are next to worthless as no one is interested in old analogue equipment.  Nikon F5's, which used to command $3200 back in 1996 when they were first introduced, now can be had in excellent condition for $400!  A Nikon F90s with MB10 booster had an original cost north of $1000 and is now available for less than $200 if you look around.  What is fascinating is that old Soviet cameras that used to only cost $200 -$250 are still selling in the same range.  Who knew that Russian cameras would maintain their value so well!

If you have an old family film camera, hang on to it.  Put a few rolls of film though it and enjoy the analogue feel of some of the best made mechanical wonders of the 20th Century!

If you want to read more about old cameras, check out "My First Camera" and some of the postings about where folks started their photographic journey.

I am regularly asked if someone can attend our photo seminars and bring their film camera along.   The answer is always the same - if you think there is more you can learn about your film camera, bring it along!

Do you collect cameras?  Do you have a favourite film camera?  Share your obsession here!

4 Comments

What Camera To Take On An Alaskan Cruise

5/19/2010

 
Picture
Canon DSLRs
Updated August 2013: Many people approach the purchase of a new camera the same way they would a game of Three Card Monte – thinking that any decision is going to be the wrong one and cost them dearly.   With the evolution of digital cameras over the past decade there is less chance of making a wrong decision as cameras are now usually quite reliable and capable of taking excellent pictures.  What is more important today is finding a camera that meets your photographic needs, has controls that make sense and is within your budget. 


Cameras, to my mind, fall into a number of categories:


  1. Fashion/jewellery:  this category is all about size.  They will fit in your pocket or hang around your neck like a piece of fine jewellery.  Because of their size, they usually don’t have all the features of larger cameras and often come with a limited zoom that goes from sort of wide to kind of long.  These cameras are best used to capture people and landscapes.  Moose on the distant horizon will look like dots in your pictures and not the majestic animals that they are.  
  2. Compact:  these are still small cameras but this is not their sole reason to exist.  Often these come with more semi-automatic and manual controls then their smaller cousins.  They can be equipped with larger zoom ranges and sometimes with the ability to record JPG and RAW images.  The lenses can be more sensitive in low light and able to magnify distant objects more than a fashion/jewellery camera. There is a new sub-class of cameras here that sport a large APS-C sensor in a small body - The Fuji X-100S is just one example.  Equipped with a fixed lens that  performs well in low light, this is a camera for the person who likes analogue controls and great image quality.
  3. Superzoom:  often larger than the previous two categories, these cameras have a  zoom range sometimes able to magnify an object 12X, and capable of drawing in distant wildlife.  While the previous two classes of cameras often do not come with any viewfinder other than the rear LCD screen, most super zooms have an electronic  viewfinder like a camcorder.
  4. Small DSLR:  a digital single lens reflex camera with interchangeable lenses and a host of accessories that can be purchased.  These are the smaller versions of their full-sized brethren; they produce very good images at the cost of having to carry everything around in some kind of bag. Canon's new SL-1 is one of the smallest DSLR's on the market - so small that for me, I don't find it particularly easy to operate with my fat fingers - try it out for yourself to see how it feels.
  5. EVIL camera: no, not the spawn of Beelzebub, but Electronic  Viewfinder with Interchangeable Lens camera. now sometimes called Mirrorless System Cameras. These cameras are a new class that are smallish units with, as the name implies, viewfinders like compact superzooms (some with external viewfinders that need to be attached)  and interchangeable lenses like a DSLR.  You can build a system of lenses to meet your particular needs but they can cost as much as some DSLRs.   As I become older and don't want to carry heavy equipment very far, I am finding this category of camera more and more appealing.  I am currently using a Fuji X-Pro 1 and love the fact that a complete system fits in a small messenger bag.
  6. Full size DSLR: for those photographers who want the (arguably) ultimate in image quality, flexibility, as well as the costliest, largest and heaviest cameras to schlep around.  These “system” cameras have every accessory you could imagine, a range of manual adjustments and the accompanying learning curve.  These are for the photographer who is serious about their hobby and doesn’t mind taking the time to learn how to get the most out of their camera.
So now you need to ask yourself a few questions to determine which class of camera you might want to look at:

  1. Do you want  a camera you can drop into your pocket?  Look at Fashion, Compact or small Superzoom cameras.
  2. Do you just want to take snapshots ?  All cameras can take quick snapshots, but you will probably be happiest with a Fashion, Compact or Superzoom.
  3. Are the majority of your photos family/people shots? Fashion and Compact cameras are for you.
  4. Are many of your photos wildlife shots? Superzooms, MIrrorless or DSLRs would be good choices.  If your wildlife moves quickly, stick to a DSLR.
  5. Are you interested in using the manual controls on your camera to control the final image?  DSLRs and EVIL cameras will usually give you the easiest access to manual controls.
  6. Will you print out your photos?  All cameras will easily produce 8 X 10 images and larger.  
  7. Is your computer relatively new?  Old computers and new cameras can equal trouble if the file size of your pictures jumps up a great deal when compared to your old camera.  Upgrade your computer, stick to shooting JPGs or keep the pixel count down on your new camera.
  8. Do you want to shoot RAW or JPG?  RAW images can stand up to more manipulation in a computer.  If squeezing the last ounce of quality out of your image is important to you, look at a DSRL or possibly an EVIL camera.  That said, the compact Canon S-110 shoots in RAW and still fits in your pocket.
Once you have thought about your photo/camera needs, go to a well stocked camera store and handle some cameras in a category that makes sense to you.  See if it feels right in your hands – are the controls in the right place?  Do you accidentally hit the on/off switch when you are looking for the shutter release?  Is the menu easy to understand and work through?  If you are buying a camera without a viewfinder, see if the salesman will walk you outside and let you try to use the screen in bright light – it may not be as easy to see an image in daylight as it is in the store.

Every camera is a compromise.  It may be in the feature set, the configuration of the buttons, the zoom range of the lens or the price itself that you will have to bend on.  The question always is, which features do you need and which ones can you live without?  Buying most brand name cameras means that you are buying a degree of quality.  The question is whether that quality matches what you are looking for in a given feature set.

Regardless of which camera you select, we will work with you during our photo seminars so that you can get the best out of it.  All cameras are capable of creating great images under the proper circumstances.  We will find those circumstances and make you proud of the images you create!

Have I missed a category or camera?  Let me know what other considerations go into a successful camera purchase!

Point and Shoot Cameras Aren't

5/5/2010

3 Comments

 
Picture
Dall's Porpoise At 55 km/hr Off Juneau
Back in the day when the earth was still cooling, I purchased my first "real" camera - a Pentax Spotmatic II.  I paid the astronomical sum of $214 for it and, in spite of its name, it didn't have a spot meter in it.  Thus I learned two valuable lessons - Pentax makes some great cameras and never believe marketing hype!

Ever since, cameras have gained more and more complex features that have taken work away from the photographer.  Today we use what amounts to a optical computer that needs to boot up, uncover/deploy the lens, determine which orientation the camera is in, establish what light sensitivity to use, recognize the size and format the final picture should be in, if there is a face that can be recognized, where the main subject is, what proper exposure to set and what shutter/aperture combination should be used.  All of this happens, in some cases, in well under a second. 

Having done all this, the camera still needs to be told to focus on the subject, trip the shutter and write the image to the memory card.  The space between pressing of the shutter and the final recording of the image is known as "shutter lag" and can be a frustratingly long period of time.  Cameras.co.uk has a shuttle lag table that compares a number of cameras.  The shuttler lag ranges from 0.18 to 1.68 seconds for a single image and 6.1 to 40.43 seconds for five images.

This type of delay, especially at the long end, can be the difference between having more that one photo of a grandchild blowing out birthday candles or a speeding Dall's Porpoise that can travel at 55 km/hr.  Old film cameras really were point and shoot (once you had adjusted the necessary settings on the camera) with instantaneous "writing" of an image to film.  Today's cameras need to make these settings on the fly and it can really slow down the act of taking a picture.  Photographers who want to gain precious time will "preload" the camera by pointing to where the action is (or will be) and softly pressing and holding the shutter release halfway.  The camera will focus, charge the image sensor and perform any and all other calculations necessary to get the shot.  When the action is just right, or when the subject enters the frame - press the shutter release all the way . 

The same technique can be used to prefocus on one part of the image and then recompose (move) the camera to get a better photo.  This works well with portraits or landscapes where you may not want the subject in the centre.  Point the camera directly at that large tree in the landscape (or at uncle Bill), gently press the shutter release part way, then continue to hold and recompose so that you subject is now in another part of the image. 

In essence, today's cameras are really "point, press and shoot" and if you can use them this way, you will eliminate some of the lag you may be experiencing in your camera.

Has shutter lag ever "caught" you at a bad time?  Feel free to share your pain in the comment box.

3 Comments

Up Close and Personal

4/9/2010

 
Picture
Totem Pole Detail, Anchorage
Robert Capa, the famous 20th Century photojournalist and war photographer, once said "if your pictures aren't good enough, you aren't close enough."  The only combat most of us will see is fighting our way through a buffet line on our favourite cruise ship, but the principle still applies today. 

Often our first impulse as photographers is to take that wide, establishing shot to remember where we were or prove to our friends and relatives that we went on vacation.  Some photographers, for some inexplicable reason, need a shot of themselves in the image - here is me in front of the Eiffel Tower, here is me at the Louvre, here is me in front of Notre Dame.  Just try getting an unobstructed close-up of the Little Mermaid in Copenhagen without everyone's aunt and uncle in the photo.  I eventually gave up trying for a clear shot and now have a photo of the Little Mermaid with a wonderful, extended Turkish family in the foreground.

By all means, take the establishing shot and the shot with your family in it, but stop and look for the details in the image as well.  By moving in close, you'll capture the detail and texture of the subject that you often miss in the wide shot.  You'll also reduce or eliminate any distracting background elements that may creep in.  The photo to the right is of a totem pole in front of the Alaska Court System Building in Anchorage.  The establishing shot includes the entire totem pole as well as the interesting yet distracting court building.  Getting in close gives the viewer a chance to focus on the colours and shapes of the totem pole and to sense the texture of the wood.

I am sometimes asked "how close is too close?"  The answer I always give is the old adage - move in until you think something is missing from the picture, then move back a step.  Give this a try - get in the habit of taking a close-up for every wide shot.  At the end of your trip, look at your pictures side by side and ask yourself which are the more compelling  images?  You may surprise yourself with the answer!

<<Previous
Forward>>

    Dougall Photography


    [email protected]


    Follow Dougall_Photo on Twitter

    Blog Archives

    June 2018
    January 2018
    September 2014
    July 2014
    June 2014
    July 2013
    May 2013
    April 2013
    January 2013
    September 2012
    July 2012
    June 2012
    May 2012
    November 2011
    October 2011
    July 2011
    June 2011
    April 2011
    December 2010
    November 2010
    October 2010
    September 2010
    August 2010
    July 2010
    June 2010
    May 2010
    April 2010
    March 2010

    Blog Categories

    All
    Alaskan Ports
    Baltic Ports
    Canadian Ports
    Caribbean Ports
    Contests
    Cruise Reports
    Cruise Tips
    Guest Photo Blog
    New England Ports
    New York
    North Atlantic Ports
    Photo Blog
    Photography
    Ports
    Ships
    Shore Excursions
    Tiny Travel Tips

    RSS Feed

    View my profile on LinkedIn
Web Hosting by EasyCGI