Dougall Photography |
|
Today's Guest Photo Blog is brought to you by Jeff Fidyk, a wonderful photographer with a natural eye for creating images that are visually quite interesting. On a recent trip to Nova Scotia, Jeff created these images below. ![]() 
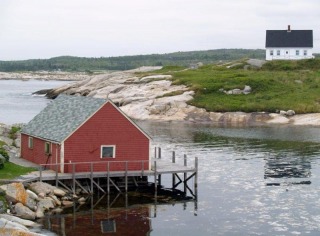
I always enjoy taking a different perspective on things, whether it’s a matter of opinion or with respect to photography. Case in point is a recent excursion we made to Peggy’s Cove while visiting Halifax for a few days. Of course the feature attraction at Peggy’s Cove is the iconic lighthouse perched atop a barren landscape of rock that cascades to the Atlantic. However, me being me, I actually took a greater interest in exploring and photographing the area leading up to and adjacent to the famous icon. ![]() Not to say that I didn’t shoot the lighthouse; I did walk away with nine shots of the lighthouse itself from different vantages. My point is exemplified by the 81 photos I took of the various things in the area that caught my interest and in my opinion express more about the area and of our experience there than simply focusing on one simple icon that every other person with a camera will also have added to their collections. These images are of a few of the things that caught my interest. ![]() 
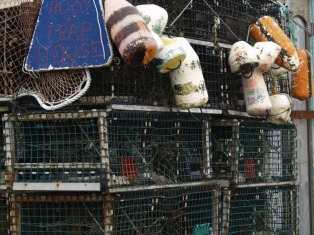
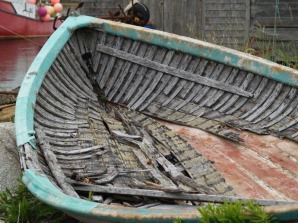
I am using an Olympus E-500 with a 14-45mm lens. For many of the shots I let the camera auto-select the aperture and shutter speed and I fine-tuned the white balance. I was really pleased with the accuracy achieved with color tones and brightness using this method. I really enjoy taking detail shots as illustrated by the stack of lobster traps, inadvertently decorated with the colourful buoys. The tattered old boat with its detailed ribbing was also intriguing. In the case of the boat, the phrase “one man’s garbage is another man’s art” is likely appropriate. ![]() Netbook, external drive and accessories Time was when we went on a long trip like an Alaskan cruise we had to calculate how many pictures per day we would take and then buy and carry a great deal of film with us. Heavy use for me used to be two 36 exposure rolls a day. Those days, thankfully, are long gone. The problem today is we take more pictures and go through memory quite quickly. I can't believe that even with a 32GB card in my Canon 5D MK II and close to 1000 exposures available, I still seem to have to ration my memory cards on a longer trip. If you're are headed on an Alaskan cruise, chances are you are going to be taking a lot of photos - possibly more than will actually fit on your memory cards. Running out of card space while on holidays can be a bit of a hassle, but you have several options available to you before and after the fact: 1. Buy more cards before you go: memory today is cheap. I can walk into my local Costco and pick up a 36G card for about $100. Back in 2001 you couldn't buy 256MB of memory for that kind of money. 2. Buy more cards along the way: many ports have shops that will sell you additional cards at only slightly usurious rates. Still, it would be cheaper to buy them on shore than from the photo shop on your ship! 3. Record only one format: if you are used to recording RAW and JPEG's at the same time, go for the RAW and post process to JPEG later. Depending on your camera, this could let you take 25% more photos on the same memory card. Going only for JPEG's will let you cram more images into the same amount of space as RAW files, but you might not want to forego the flexibility of RAW. 4. Delete some of the images that just don't work: while you always want to bring back all your images and edit them later, sometimes this is the only way to get more memory card space. Be very careful to erase only the images that don't capture the right moment or composition. It is dangerous to judge exposure on the small, bright LCD screen of a camera. 5. Backup onboard: check with the computer lab onboard ship to see if there is a time set aside for passengers to transfer their pictures to DVD. Some labs still only burn CD's which hold next to no data. Even standard DVDs only hold 4.7 GB, meaning my 32GB card would need 7 single sided DVD's to transfer all images. As an alternative to DVD's, if you own a large thumb drive (32GB), you can have the capacity of 7 DVD's in a tiny device, but it still may not be enough backup space for you. 6. Backup onshore: use an onshore Internet Cafe to transfer (or upload) images. In Alaska, Seaport Cyber Cafes are available in most ports. Currently rates are about $6.00/hour. For free Internet access, try the public libraries in any port. Be warned though, these are popular places and you will want you to get there early. 7. Bring your own laptop: I travel with a netbook with a 250GB hard drive and a small, external 500GB hard drive. The netbook is my solution. It's small and easy to carry and lets me backup my images in my cabin at any time for no additional cost. For me, bringing lots of memory and a small netbook to back everything up works well. Think through some of your options ahead of time as your options diminish once your are on your cruise. There is nothing worse than running out of memory just as the whales begin to breach! ![]() Paris Mon Amour I have sat in front of the large black and white photograph for years. It hangs on the wall just outside the women's fitting room in a local department store. There are two chairs next to the photo to accommodate husbands and boyfriends caught in that fashion limbo that requires us to wait patiently for our significant other. As I whiled away my time in this limbo, I have come to know this photograph rather well. Shot from inside an apparently empty Paris cafe, the darkness of the interior contrasts with the brightness of the summer day outside. There is only one person visible in the image and they are caught, hanging mid stride in the air, as they run across a wide roadway. While a few cars and one street car can be seen in the photo, it is otherwise a quiet, static photo. I don't know whether it is my innate love of Parisian cafes, the dynamic range captured in this image, the sense of depth, or the feeling of a moment caught in time, but I have always enjoyed looking at this image. I imaged that it may have been shot in the 70's as the pedestrian's pants look like they may be bell bottoms, but there wasn't much else I could derive from the unnamed image in the department store. Fast forward a great many years until today, sitting with my old friend the Parisian cafe image, I decided to photograph it with my iPone and then mail it on to my main email program at home This may sound like I was pirating the image for my own use, but actually, I wanted to run a program called TinEye that I have recently used as a reverse image search tool. You point TinEye at an image on the Internet or on your computer and it will find other examples of the image on the Internet. I use it to determine who is using my stock images as I really have no other way of finding examples of my photos being used on web sites. When I loaded the photo from the department store into TinEye, it quickly showed me a number of other instances of the image appearing on the Internet and I learned that it was called "Le Cafe de Flore tote le matin" or "Cafe de Flore, Early Morning", shot by Jeanloup Sieff in 1975. The search also produced references to a book sold by Amazon called "Paris Mon Amour" with Sieff's image on the font cover. For less than $14.00 this book is a marvellous collection of Parisian images taken by photographers from the late 19th century onward. Sieff, who passed away in September 2000, was a fashion photographer who was well known for his work with such magazines as Harper's Bazaar, Vogue and Glamour. My old friend the department store photo now had a pedigree and just for the heck of it, I decided to see if the Cafe de Flore still existed. I fired up Google Maps and entered the name of the cafe and sure enough, on the ground floor of the Hotel Jardin de Paris, on the corner of Boulevard Saint-Germain and Rue Saint-Benoit, sits the Cafe de Flore still in operation today! Now of course, I had to see if there was a street view from the cafe to try and stand where Jeanloup did when he took the image and indeed I could "stand" on the street just outside the cafe. While some of the businesses have changed, the newspaper kiosk is still across the street from the cafe and the surrounding buildings are still the same. The main difference I think is the amount of traffic on Boulevard Saint-Germain. Today rather than hovering above the street as the pedestrian in the photo did, you would have to fly across if you wanted to avoid the passing traffic! I am amazed how technologies now can come together to help solve these visual mysteries and I am also pleased that now, as I sit beside my old friend, I better understand exactly where this image was taken and by whom. ![]() Dragon Fly and Lily There is not much to say about this shot other than it is great to be able to just walk out into your own backyard and find an image like this. For all the journeys I take half way around the world, some of the most astonishing images I have are taken steps away from my back door! ![]() Rain Over Seattle First, don't touch that camera dial that gives you black and white or sepia photos right out the camera. Yes, go ahead and use the VIVID or LANDSCAPE color settings, but please don't go so far as throwing out most of the color in your photographs. Wait until you get back home and do just a little post processing to make your photo into an old time sepia image. This image was taken during a one day port excursion in Seattle. As we pulled into Pier 66 it was dry but cloudy. By the time we made it to the top of the Space Needle it was cloudy almost to the street and very rainy. A wall of fog wrapped around the observation deck with no sense of whether you were one foot or a hundred off the ground. As I stood there the fog lifted for a few moments and I was able to quickly take a some photos down into the city. Looking at the photos once I was warm and dry, I could tell that the rain had wiped out most of the color and some of the sharpness in the images. Rather that try to take the pictures through post processing and make a sunny day out of a downpour, I decided to emphasize the fog and the wet instead. Converting the image to sepia eliminated what little color was in the image and leaves the viewer to concentrate on the forms of the buildings instead. Adding a bit of vignetting draws the viewer's attention to the center of the image and gives the entire picture a vintage feel. I think the image works much better as one that embraces the weather conditions of the day. What didn't work as a color image works much better as a simple toned image. ![]() Abanonded Farm Near Saskatoon You have to be born on the prairies to understand that they are not empty and devoid of beauty. There is a majesty to nature that is every bit as inspiring as the mountains or the sea. We have the unending and ever changing blue sky. There is no pollution to wash out or obscure that perfect blue or the ever changing formations of clouds that move above us. I am finding that more and more I am including this dramatic and dynamic picture element in the photos I create. This shot is of an abandoned barn just south of where I live in Saskatoon. I have driven by this structure on a number of occasions, usually in a hurry to go somewhere. This day I had both the time and the camera gear so I stopped and spent an hour or two exploring this wonderful old barn and nearby farmhouse. Good thing I made the stop - the farmhouse has been removed and I am not certain how long the barn will remain standing. Next time you are making a picture, don't forget that the sky might be an important element in your composition! ![]() Canon 70-200 f/2.8 IS If I were off on an Alaskan cruise and land tour and took only one lens, it would be a Canon 70-200 f/2.8 IS or, if I shot Nikon, the equally good 70-200 f/2.8 VR. I would also sneak in a 2X extender, giving a range of 70 - 400 (on a full frame camera). I have been on ships, boats, trains, planes and automobiles. I have been on boardwalks, river walks, decks, piers, docks, beaches, and forest trails. In every place the 70-200 performed well. The combination of image stabilizing and fast f/2.8 aperture worked flawlessly in all weather conditions and at all times of the day. I have used the Canon 100-400 f/4.5-5.6 IS, but I hated the push-pull zoom that acted like a pump sucking dust onto the camera sensor each time I used the zoom. While the 100-400 possessed IS, it was a great deal slower than the 70-200. Perhaps surprisingly, the 70-200 is slightly heavier and with the 2X extender factored in, does mean you are carrying a more weight than the 100-400. What about if you use a crop camera? The 70 - 200 will work just fine providing you don't mind the cropped view. Jan, who shoots a 1.6 crop camera, really only uses one lens in Alaska - a Canon 70-300IS DO lens. This lens doesn't get a lot of respect, but its relatively compact size and zoom range has made it an ideal travel companion. With an aperture of 4.5 - 5.6 it's not fast, and 300mm on a crop camera seems closer to 500mm making it a lens Jan has to brace or crank up the ISO in dim conditions. Still, even with these disadvantages, Jan is able to create images that sell quite nicely on iStockPhoto. We are often asked if a lens longer than 400mm should be taken to Alaska and the answer is "no", unless you are doing the Alaskan land tour on your own. If you are on a cruise tour, you are going to find yourself in a vehicle looking out at wildlife as many won't let you out of the bus or van in the presence of wildlife. Inside the cramped quarters of a tour vehicle, there is just not enough swinging room to bring a Canon 500mm to bear on a distant mountain goat. You really need to be on your own where you can setup your large lens away from the madding crowd. So, a general rule of thumb - the more people you are travelling with, the less chance there is of using a long lens. ![]() Car Ferry in the Stockholm Archipelago After writing What Camera Gear To Take On An Alaskan Cruise, I have been asked several times if I recommend different gear for other cruises. There are two things that affect what I carry - what the airplane journey will be like and what I expect to photograph. Since Alaskan embarkation ports are relatively close to home, the journey is simple, short and not prone to the limitations of trips outside North America. Because of this, I don't mind carrying more gear on these short "domestic" hauls. Alaska, more so than most other cruises, holds the promise of wildlife on land and sea - but often at quite a distance. This means that I want my longest lenses and a couple of DSLR bodies so that I can be ready to go from landscape to wildlife work. So, with shorter distances to travel, less restrictions of cabin luggage and the need for longer lenses for wildlife, I find myself carrying more gear. This is a luxury of choices that I just don't feel I have on long international trips. While I will take two camera bags to Alaska - one for travel and one to use at our destination, everything has to fit into a single, multipurpose bag on long trips. I opt for a ThinkTank Urban Disguise 40 although larger ones are available. This is a messenger-style shoulder bag that holds all the gear I would want to carry around all day. Into it I will pack a Canon 5D Mk II with grip (usually stored without a lens attached), a 24-105 lens, a 70-200 f/2.8 IS with 2X extender, a Canon S-90 backup (a lot lighter than the Canon 1D!), my netbook in the back pouch, and various memory cards, GPS adapter and other sundries in the front pouch. I also throw a small flash and 50mm f/1.4 into my suitcase along with a tripod if I choose to look like a hobo on the trip! Once at our destination, I unpack the Urban Disguise and only put into it the things think I will need on a particual day trip. My preference is often to go ashore with only the 24-105 and for my shooting style, that is often all I need. Photography friends of mine would leave that lens behind in favour of the 70-200 so it really does come down to what you like to shoot with. Do you have the perfect combination of camera gear to take on a cruise vacation? Leave a comment and let us know. Dusk or dawn is when I prefer to look for images to capture. This is the best light for many landscape photos when the light has a rich, warm tone to it and it glances across objects giving them body and texture. While I prefer to shoot during these “magic hours”, I often find myself out in the hot light of midday, packing camera gear from location to location like some kind of rented mule. ![]() Golden Hour in Las Vegas Dusk in Las Vegas: this is my ideal time to shoot – the sun has gone down but the sky is still light enough to render the shapes of buildings. Lights have come on and you have the best of both worlds – ambient light to tell you where you are and spectacular city lights to paint an evening picture. Let’s face it; there are times you will find yourself visiting locations and tourist sites outside of the beautiful light of dusk and dawn. Too often I am standing under the blazing sun looking for the best angle to take a photo while trying to tame the bright highlights and inky deep shadows. As I work to create an image in these conditions, I try to draw on some of techniques I have used in the past when I shot film and now bring to my digital photography work. ![]() Canada Place, Vancouver Pick a low angle: shooting on a bright day can be great if you keep a few simple things in mind, like shooting with your back to the sun to keep colors from washing out. We learned this one early as photographers – have Aunt Bess face the sun so that you get a clear image of her squinting myopically at you. We know now to put Aunt Bess in open shade to get a better image (although she may still squint at you), but it’s hard to move a building out of direct sun. A sunny day produces great color, but can also throw some wicked shadows across the scene you are trying to capture. Shooting below eye level will sometimes hide the shadows so you don’t have to deal with them in postproduction. This image of the Pan Pacific Hotel in Vancouver was taken to show off the huge white “sails” set against the sky. By crouching down in front of a large pot of flowers I was able to hide the dark shadows cast by the pot and the low brick wall running along the walkway. Even without the motivation to hide shadows, shooting low often produces a more dramatic image than shooting at eye level. ![]() Gamla Stan, Stockholm Find the shade: the shade can often be your friend of a bright day. If you are able to shoot in open shade where the sky is very bright but there is no direct sunlight on your subject, you can avoid the highlights and the shadows fighting with one another. These buildings in Gamla Stan, Stockholm were in open shade with a light blue sky and no shadows. A few minutes earlier, the sun was raking directly across the face of the houses creating dramatic and difficult to deal with shadows. Sometimes just sitting at a sidewalk café and having a coffee will give the sun time to move and give you a better chance at a useable image like this. ![]() Danish Castle Wall Look for textures: moving closer to a subject cures a lot of woes, from eliminating distractions to emphasizing texture and shape. A simple rule of photography – if your pictures lack impact, you aren’t close enough! This wall in Elsinore Castle, Denmark was being eradiated by a hot noon sun. Fortunately the light was striking the wall at a bit of an angle giving some definition to the brick. ![]() Gamla Stan, Stockholm Fight the shadows: you can also take the more stubborn approach to midday light and just pull the detail out of the shadows and highlights in postproduction. While I would love to set up a tripod and do a proper HDR rendition of a scene, I don’t carry one as much as I used to. Instead, I have been known to utilize Photoshop to temper the extreme dynamic range of a photo. This is no magic bullet solution as opening up shadows can inject ugly noise as the program tries to invent details. Highlights lacking any detail just turn a dull gray if you try to tone them down and literally add nothing to the photo. Adjustments need to be subtle and can enhance a properly exposed image, not save a badly exposed one. This quiet street in Gamla Stan, Stockholm had a hot white sky peeking between the builings and dark cobblestones below. I used a fake HDR technique where I created an additional light and dark version of the single image to open up the shadows and darken the sky respectively. I then blended the three images in Photoshop with this image being the result. I am still going to replace the sky at some point as there is not enough detail there for my liking, but as a stock image it sells just the way it is. ![]() Joshua Tree National Park In camera corrections: what you can correct in your camera is far better than any postprocessing used to salvage an image later. Most landscape photographers carry two filters with them – a polarizing and a graduated filter. A polarizing filter displays its strongest effect when used at right angles to the sun. When shooting with a wide angle lens where a great deal of sky is visible, part of sky is often quite dark, with the effect tapering off on each side. For a more consistent effect I prefer a light blue graduated filter. It creates a constant effect across the entire image regardless of where the sun is. It also lets me control the bright white of the clouds and helps prevent the detail from disappearing. With the clouds toned down, it is usually possible to render the entire image within the dynamic range of my camera. Creating images during the day is just a rewarding as at other times. We need to understand where the shadows fall and how bright the highlights are. If I can only control for one of these, I fall back on my “old school” photography skills when I shot slide film: expose for the highlights and let the shadows fall where they may. We will be exploring these and other ways to take stunning photos in broad daylight on our next cruise and photo seminar on May 13, 2011. You can learn more about our seminar here. ![]() Back Street in Gamla Stan Many first time cruisers are as afraid of the shore excursions as they are of getting seasick. They believe that they will be trapped on a bus full of octogenarians slowly moving from tourist trap to tourist trap, pausing only for the occasional photo stop or pee break. You can avoid this scenario with just a little preplanning that will let you chart your own course and go your own way. Here we have outlined some alternatives that you might want to consider to keep you from seeing everything through the window of a tour bus: 1. Wait until you step off the ship to book your tour: this doesn't work in all ports of call, but in some, local tour companies set up kiosks to hawk their services. If you like to be flexible and take things as they come, you can find some good deals on interesting excursions right on the dock. A number of ports also have hop-on-hop-off buses stopping close to the pier. These buses will give you an entire tour of the city and allow you to get off and explore whenever you want. 2. Book ahead of time via the Internet: typing the name of the port followed by "city guide" into any search engine will get you a number of leads to local tours and guides. This doesn't help determine the reliability of a guide halfway around the world though. We use sites like cruisemates.com and cruisecritic.com to look for recommendations from other cruise passengers who have visited in the ports we are interested in. Booking a local guide is best in cities where there is little English spoken or where the tourist infrastructure doesn't cater to foreigners. We have booked our own car and driver in St. Petersburg on a couple of occasions and were able to visit a number of places where only the locals go. 3. Cruise ship walking tours: while you will still be with a group of fellow passengers, walking tours will usually take you to the center of town or to places where tour buses simply can't go. You will still probably hit regular tourist attractions, but you will be able to experience the port at street level and at a more relaxed pace. 4. Your own walking tour: if you arm yourself with a little bit of local information, you can often go exploring on your own and then find your way back to the ship the same way you left. Cruise ships will provide maps that will help you navigate most ports of call. Using the Internet to research a port ahead of time is a good strategy as is asking your crew about the interesting things to do in port. There are a number of iPhone apps that will help you explore as well. Take a look at Real Southeast Alaska app that will provide information about major ports and as well as less visited ones. Cruising Alaska: A Guide to the Ports of Call is an entire book (and costs as much) that you can carry around on your iPhone. City Listen provides MP3 sound files that let you take your own walking tour of some cities including New York and Paris. Continuing in the vein of "there's an app for that", the iPhone apps store has guidebooks and maps for most major ports of call, giving you the ability to carry a great deal of information around in your pocket. 5. VIP Cruise Tours: more expensive than regular shore excursions, these tours have fewer guests and go to more exotic places. These are great for passengers who want a little more excitement but don't want to make independent plans. As an example, in Juneau, a VIP gold mine tour takes guests into an abandoned gold mine. 6.Tours with local photographers: it used to be you had to book these kind of tours on your own, often at considerable expense. Now, passengers can find cruise tours lead by local photographers who will know the places to go at the proper time to catch the best light. There is a great photo expedition you can book on some cruises that takes you whale watching and hiking with a local photographer in Juneau. Princess also has several photo expeditions you can book on the Canada/New England run. If you are interested in finding the path less travelled, there are a number of options available to the resourceful cruise ship passenger. If you have your own ideas about getting off the tourist trail, please share them with us here. |
Dougall Photography
Blog Archives
June 2018
Blog Categories
All
|