Dougall Photography
  • Home
  • Stock Photography
  • Tips and Trips
  • Photos

What Canon Lens To Take On A Baltic Cruise?

7/18/2012

 
The answer to this question depends on what kind of photographer you are.  If you prefer capturing the details of your surroundings, a telephoto zoom or even a macro lens may be a good choice for you.  If you are a “big picture” photographer who prefers to capture sweeping vistas encompassing all you see then a very wide angle lens may be best for you.  For me, if I could only take one lens on a Baltic cruise, it would be a Canon 24mm - 105 f/4 IS on my 5D or, on a small sensor crop camera like a T4i, a Canon 15mm - 85mm f/3.5-5.6 IS. 

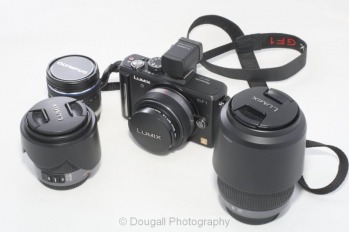
A Baltic cruise is largely urban exploration via cruise ship.  Most itineraries are very port intensive with many ports along the way.  Rarely will you get the chance to escape the city you are visiting to find wide open spaces and thus rarely will you need a telephoto lens longer than 135mm.  In a city setting you will probably find a moderate wide angle to moderate telephoto zoom will serve you well.  These lenses aren't particularly heavy so you can schlep one around on even the longest shore excursion.  They are also small enough that taking it in and out of your day pack or wrestling on and off mass transport should be easy.  Finally, a small camera/ lens combination means that you should be carrying a smaller camera bag.  This means should should hear, as I did upon entering a museum in Zurich, the dreaded words “zu groß“, which meant I had to leave my huge camera bag with the nice matron at the front desk rather than be allowed to knock around the museum with it.

The modern Canon image stabilized lenses promise to increase stability by three stops.  That means that an f/4 lens could give you sharp images as if your were using an f/1.8 or f/2 lens.  An f/3.5 - 5.6 lens could behave as if it were an f/1.8 - 4 lens.  This means you should be able to get decent shots even in dimly lit churches and museums if they allow you to take photographs.
Picture
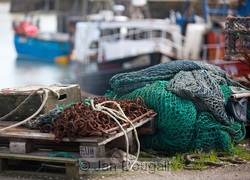
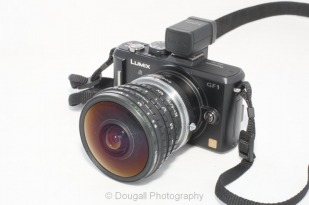
Gourdon Harbour Detail with f/2.8 Lens
Please remember this “three stop advantage” assumes you are a steady shooter.  Never trust this rule of thumb - check it out for yourself.  Long before you leave on that cruise, make certain you have the lens you are going to travel with in hand and visit your own local churches and museums that allow you to take photos inside.  Experiment with various shutter settings to determine just “how low you can go”.  You may find that, depending on lighting conditions and whether you are using the wide or telephoto setting or bracing yourself against something solid, your results vary.  Knowing this ahead of time will save you experimenting while on tour somewhere and prevent disappointment later.

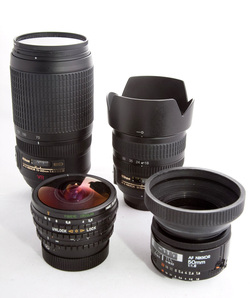
I also pack a second, single focal length (prime) lens like a 50mm f/1.8, 35mm f/2 or the new Canon 40mm f/2.8.  While not really much faster than either of the lenses I have recommended (once the image stabilization is taken into account), a fast lens like this is very small and easy to bring along. It also does a much better job of delivering a very narrow depth of field that will throw the background out of focus and let your main subject "pop".  This effect comes from a wide aperture, not from image stabilization, so an f/2.8 lens will be able to provide a narrower depth of field than an f/4 lens used at a similar distance and focal length.

To sum up then, take a moderate to wide angle zoom lens, augment it with a fast prime and test your ability to handhold your camera and lens combination before you go.


Special Thanks to David Langan

11/20/2011

 
Picture
Dunnottar Castle, Aberdeenshire
Our first real stop this summer was Aberdeen, Scotland, a city of 217,000 located about half-way up the eastern coast of the country.  As the staging point to the North Sea oil industry it's a prosperous and busy city that is quietly beautiful and appealing.  Often called the Granite City because of the use of local stone to build everything, it projects a sense of stability and honesty.  Jan and I loved the city from the start.  The downtown core is easy to walk around with the Mither Kirk, the fine Aberdeen Art Gallery, the Union Terrace Gardens and the Old Town Market easily reached from the central train station.  A little further afield are the Duthie Gardens, and the University of Aberdeen in what is known as "Old Aberdeen", an area that used to stand apart from Aberdeen itself.

The city is located in Aberdeenshire, an area of picturesque, rolling farmlands that reminds me a great deal of Saskatchewan.  Many folks come here to travel the Whisky Trail which includes the Glenfiddich, Glenlivet, and Strathisla distilleries. There is also the Castle Trail which takes visitors to see many beautiful castles - some ruined, some restored and some still lived in.  Dunnottar Castle, pictured above, is one such castle ruin located to the south of Aberdeen.

We were immensely lucky to spend a day with David Langan, a local fine art photographer.  David picked us up at our hotel and took us first to Old Aberdeen to walk the quiet streets and gather some morning images of this beautiful district.  The University of Aberdeen is located here and everywhere you turn old and modern architecture and sculptures share the landscape. 

Next we headed to Stonehaven to visit Dunnottar Castle, a ruin set on a spectacular seaside rock outcrop with impressive vertical cliffs protecting its position.  William Wallace is said to have defeated the English near the castle at the end of the thirteenth century.

From here we travelled south to the small village of Inverbervie to grab lunch from the Bervie Chipper, a fish and chips shop that has won national awards in Scotland and the UK.  We took our lunch to the Gourdon harbour and sat on the jetty of this small and picturesque fishing harbour to take in the views and eat some remarkable, fresh fish.  We explored the harbour for a while before driving to Fyvie Castle, a huge, beautiful pink fortification.  Not only is the colour remarkable, but it is said that it is one of the most haunted castles in the UK.  The only white apparition we saw while there was the bride's dress in a bridal party using the ground for photos.

Our final stop of the day was a private castle that has been lovingly restored by Marc and Karen Ellington.  What a pleasure to walk through the beautiful gardens in front of the castle and then to have an opportunity to see it from the inside.  Marc and Karen were wonderful hosts and the residence was simply stunning.

David was a brilliant guide, driver and tutor.  He has a tremendous sense of light and made certain that each stop took full advantage of the sun's position on the unusually beautiful and warm summer day.  Without David we wouldn't have seen so much of this beautiful country, learned so much about Scotland past and present or had so many doors open for us to explore behind.

iPhone Photos - North Atlantic Cruise

11/6/2011

 
Picture
Sod Houses, Iceland
We have finally posted some of our images from our last cruise through the North Atlantic.  This gallery is a bit different though as all images were shot on an iPhone 3GS and processed using iPhone apps while in the field.  While we have far more images using the big cameras, we thought these turned out well and are fun to look at. 

For those interested in what iPhone apps we used here is our short list:

Procamera
Pro HDR
Dynamic Light
finarXImage
PhotoForge2
Pic Grunger
Paper Camera

I treat iPhone photography much like using a toy or  LOMO camera.  I have come to embrace the grain, the saturated colors and the ghosting in HDR photos.  The quality of the images will never rival a DSLR, but these pictures sure and fun to take and process!

Still Searching For The Right Camera Strap?

7/15/2011

 
Picture
Nikon Advertisements
If you use a compact camera, chances are you don't agonize over choosing the best neck strap for your camera.  You install the one that came with the kit and you are good to go.  The same choice is not always so simple with big, black SLRs.  Not only are the cameras large, but with battery grip and telephoto lens, quite heavy indeed. 

Most camera makers do give you a neck strap as part of the entry price into your new camera, but they spend more time designing the placement of their logo rather than ensuring you have a comfortable fit.  These straps usually consist of a black nylon or canvas strap with hard edges and little "give" or flex to the material. 

Back in the day, the straps were even worse as they were made of very thin nylon webbing with a movable (always in the wrong place) rubber shoulder pad. Thankfully, there a better choices today!


Picture
Canon F1n with leather strap
Camera straps are a lot like camera bags - some photographers are always on the search for the perfect one.  In my ongoing search for the perfect camera strap I look for certain characteristics: softness, flexibility, "give" in the strap that allows it to stretch under load, a quick release mechanism to remove the strap, and metal hardware for long wear (I keep my straps for years and move them from camera to camera). 

Years ago I gave up on manufacturers' straps and vowed that I would not provide free advertising of my cameras to potential thieves.  I began replacing my uncomfortable corporate neck straps with wide, soft leather "field straps" made by Globus Inc, a company that doesn't seem to be around any more.  These straps came in brown or black, had a wide, soft  neck pad, gave a little when slung around the neck and had metal hardware.  I purchased a number of these in the late 70's and still use them today on some of my cameras.  The only downside is that they are made of such soft leather they don't stay on my shoulder.  I have developed a habit of holding the strap part way up and pressing it against my body to hold it in place.  I have done this for so long that I don't even notice anymore and the camera never moves as I walk.

Picture
E-1 hand strap and Lowe-Pro neck strap
More recently I have been using Lowe-pro neoprene straps (model 2070910)  that have many of the same characteristics as my beloved leather ones.  Again, these are soft straps with the natural give in them to allows for flexing and stretching when under a heavy load.  They have metal hardware and a separate piece of strapping that attaches between the camera and the neck strap.  The strap itself is then connected by quick release rings making it easy to detach the strap for storage or when it's not needed.  The neoprene neck pad has small "nubbies" on the underside that keep the strap in place on my shoulder.

When wouldn't I need a neck strap?  When using a hand strap of course!  I attach a Canon E-1 hand strap to all my cameras and then hook the neck strap to the E-1.  When I am carrying a long telephoto for an extended period of time it is far easier to hang the camera and lens off of my hand rather than my neck.  When I am doing this, I remove the neck strap (via the quick release) so it doesn't drag on the ground.

As the Lowe-pro strap has now been replaced with newer versions that are not as flexible for my liking, the new Custom SLR Split Camera Strap from B&H Photo may be a good replacement as it appears to be flexible, non-slip and complete with a removable neck pad. 

If you're finding that your neck strap won't accommodate the weight of your camera and lens or it just isn't flexible enough, begin your hunt for the world's best camera neck strap (or hand strap) - it may just make it easier to carry your camera more comfortably for longer periods of time.

10 Tips for Taking Better Photographs From a Tour Bus

7/3/2011

 
Picture
Catedral Metropolitan, Panama City, Panama
In spite of the fact that they are a integral part of many cruise excursions, I hate tour buses.  They are often cramped, crowded and hot - and there is grubby glass between the locale and me and my camera. The lack of space means that it's difficult just to extract my camera from its case let alone swing it around to take a photo through the bus window.  Often the bus blows by interesting landmarks with only a brief acknowledgement of what we are seeing let alone treat us an actual stop. 

To improve you chances of getting a good photo from a tour bus, try one or more of the following techniques:

  1. Use a digital derringer: with very little room to move, a compact camera is easy to remove from a case and hold up to the window to use.
  2. Use a small lens on your digital SLR: if you only have your big black camera, try to use a short lens so that you don't bang your gear against the window glass. A small, inexpensive prime lens like a 50mm f/1.8 will serve you well in these situations.
  3. Use a flexible rubber lens hood: this will reduce or remove any reflections that you usually get when shooting through glass by placing the hood directly on the bus window.  The above photo of Catedral Metropolitan in Panama City, Panama was taken through a bus window.  I had no lens hood but was lucky enough to get this shot with only some reflection - can you see it?  With a flexible hood, you can shoot from an angle and still have the hood completely touching the glass and preventing a reflection
  4. Use a rigid circular lens hood: while losing the flexibility, even a rigid lens hood is better than none at all.  On my Leica X1 I use a black metal lens hood from a 90mm f/2.5 M lens that sticks out beyond the front of the lens.  I can then press the hood directly again the glass window and eliminate any reflection.  
  5. Use a high shuttle speed: with scenery flying by the bus, you are going to want to freeze those moving trees, so pick a speed above 1/500 if possible or, if your prefer something more automatic, select an action or sport setting.
  6. Turn off your flash: "blow back" off of your flash onto a close piece of glass is not a good thing.  You will get a huge amount of glare and will washout the image you were trying to photograph.
  7. Turn up your ISO: some tour bus glass can be tinted - really tinted.  You may find that there isn't enough light to get a decent photo using the recommended high shutter speed.  If you camera isn't set to auto ISO, you may need to run up your ISO to 400 or more.
  8. Focus manually:  the auto focus on some cameras don't like having glass too close to them.  You may need to use manual focus (often set to infinity) so that your camera doesn't "hunt" for focus.
  9. Sit a little further back on the bus: you can often see the "best bits" approaching the window if you are a bit further back.  That way you won't be surprised as the scenery flies by!  Pay attention to the side pillars of the bus that separate the windows - some seats will place you right  beside these making it difficult to shoot around.
  10. Eschew to bus all together:  the simplest solution is not to get on the bus!  Look for walking tours that are often more photographer friendly due to their slower pace.  You can also look for tours where the bus is only a means of transportation to the real sightseeing rather than being the tour itself.
Picture
Lens Hood or No Lenshood?
While not all lenses work well with generic rubber lens hoods.  The 50mm lens in the bottom right is perfect to pair with a hood.  Zoom lenses, like the ones in the back row,  can be fitted with hoods, but make sure you don't get any vignetting at their widest settings.  Other lenses like the fish eye in the lower left don't accept any kind of lens hood - and have a front element that sticks out - so avoid placing it up against any glass!

What's My (Camera) Bag?

6/30/2011

 
Picture
Think Tank Urban Disguise 40
Photographers spend a great deal of time looking for the perfect camera bag hoping it's available on the next trip to the store.  Every bag is a compromise unless you have found one that folds the space-time continuum in such a way that a small bag holds a lot of gear and all of it doesn't weigh very much.  Sadly, I haven't seen that bag available at my local camera store, so I have had to make some sacrifices and select a bag that obeys the laws of physics.

One of my first camera bags for my digital camera equipment was the Bob Krist Travel Bag sold by L.L. Bean.  It had the distinct advantage of being taller than wide, thus allowing for a full size camera with a mounted long telephoto to be dropped into it.  At 14" X 12" X 5" and with a vertical configuration, it always felt a little awkward to carry.  While it had some endearing features including the ability to transform into a backpack, after a couple of years I was back to looking for a different bag.

The other bag I have used is the oddly named Crumpler Geekstar that had a unique lower horizontal compartment for storing lenses.  It also looked for all the world like a large, royal blue diaper bag but ultimately, like the Bob Krist bag, proved to be too large and cumbersome to easily carry around.

Today my over the shoulder travel camera bag is a ThinkTank Urban Disguise 40.  Into this 13" X 10" X 4" black ballistic nylon bag goes as much gear as I would normally want to carry.  Typically I put a Canon 5D Mk II body with grip and separate 70-200 f/2.8, 24-105 f/4, 2X extender and a digital derringer of some sort.  Without the grip on my 5D, I usually store the camera with a mounted 16-35 in the middle compartment, a 70-200 f/2.8 on one side and a 300 f/4 on the other.  Again, this still leaves room for a digital derringer to be stored in the central compartment giving me more than enough equipment for almost any circumstance.

As with most other camera bags, the inside can be configured in many different ways by attaching various partitions and platforms using hook and loop attachments.  The folks at Think Tank provide a huge selection of these partitions with the bag so there is no shortage of ways to configure the inside.

The rear zippered compartment holds my netbook and power cable.  The two expandable front pockets can hold portable hard drives, small prime lenses or an external flash.  This still leaves another zippered compartment between the main one and the front pockets.  Here there are pockets for pens, paper, lens cleaner and cloth as well as a "Pocket Rocket" - a folding wallet that will hold CF and SD cards and clips to an lanyard mounted in the bag for security.  Soft, stretchable outside pockets on each end of the bag allow for water bottles or the like to be stored where they can be easily accessed.

It's really the little extras that set this bag apart and shows that photographers were involved in the design and testing of this product.  While most bag hardware is now made of plastic, all clips, rings and zipper pulls on this bag are of metal to stand up to the most severe wear and tear.  The zippers are weather resistant and the bag comes with its own rain jacket that can be installed over the bag on rainy days.  There is an open pocket on the back of the bag that can be used to hold paperwork or, with the bottom portion open, it becomes a sleeve that will fit over the upright handle of a rolling suitcase. 

The adjustable, curved and well padded shoulder strap makes this bag relatively easy to carry even when loaded to the max with gear.  The zippers are lockable with any luggage lock you would care to use.  Most importantly, this bag is airplane friendly and will fit under the seats or in the overhead bin on the tiny CRJ's that fly in and out of Saskatoon.

As the name of the bag implies, it is meant to be non-descript rather than shouting out that it's filled with expensive cameras.  Short of carrying around a converted diaper bag to discourage thieves (I've done that,  by the way), this bag will limit unwanted attention during your travels.

The best indication that a bag works is how long a photographer uses it and this one has been my primary travel bag for four or five years now.  The bag still looks great - as the photo above will attest - and is large and flexible enough to carry all manner of camera gear.  If you are still looking for that perfect bag, this one - or another in the Think Tank lineup may be in order.

My Digital Derringer

6/27/2011

 
Picture
Canon S90
A "digital derringer" is a small camera that is easy to carry in your pocket with the controls and image quality that comes close to a digital SLR.  This is the Holy Grail for many photographers (besides the perfect camera bag); a small camera with big camera image quality. 

I bring my small camera along when my Canon 5DMkII would just be overkill.  On cruises it's what I carry during a day devoted to shopping or an evening out in restaurants where I don't want to be encumbered with a lot of gear.  I use it extensively in the confined space of a tour bus or small boat where there isn't the "swinging room" to pull out a larger camera.  I also carry it discretely in places where an expensive DSLR might draw unwanted (and criminal) attention.

The Canon S90 (now replaced by the similar S95) has been with me for a number of years, and at 4" X 2" X 1", it goes a long way to addressing the small camera/big quality balance.  It is a 10PM camera that is small and light enough to drop into a pocket yet has big camera features. It's 28-105 (35mm equivalent) lens is a fast f/2.0 at the wide end and a respectable f/4.9 at the telephoto end.  In addition, the lens is also image stabilized which gives me even more of an edge at reducing camera shake.

The camera has several other features that I always look for - the ability to shoot RAW images and a usable histogram to review exposure information.   RAW images tend to give a little more exposure latitude and allow for final processing under my control rather than relying on the camera to do the work.  The histogram gives me a better indication of whether an image is properly exposed rather than relying on the inaccurate thumbnail that appears on the camera's LCD screen.  For me, without these two features, a camera really is little more than a toy.

There is a full range of manual and semi-automatic controls, allowing for Aperture or Shutter priority, full manual, Program, Auto, and Custom as well as movie mode and eighteen - count them - eighteen special scene modes (including the ever popular aquarium mode).  Also, when shooting JPGs, there are 10 white balance setting available to you.

The movie mode is only 640X480 @ 30fps (the current S95 has 780p HD movie mode) but it still turns in very acceptable movies that don't take up much room on the camera's memory card.

Probably the feature that is most useful on the S90 is the control ring around the front lens mount.  This ring provides for easily accessed, customized control that just isn't found on many cameras.  I can decide if the ring will remain with its default use, (which changes based on exposure mode) or for zoom control, white balance adjustment, exposure compensation or ISO selection.  For those of us who grew up with analogue cameras, this is a great way to easily access one more set of controls that might otherwise be buried in a menu somewhere.

Are there any downsides to this camera?  Sure, there isn't an optical viewfinder,and I don't believe that the most stable way to take a photograph is to hold your camera at arm's length from your face!   The zoom range is also limited if you are doing anything more than general family, or holiday snaps.  At 28mm it is wide enough for most needs but at the telephoto end, 105mm (equivalent) is only 2X magnification - hardly enough to bring in that whale if you are encountering wildlife in Alaska. For this, you are going to need something like the Canon SX30 with a telephoto reach of 840mm!  While this camera costs not much more than the S95 does today, it is much larger.

The S90 has long been replaced by the S95 with only a few significant changes including the inclusion of 780P video and in-camera HDR capability.  It too, is soon to be replaced by the S100 rumoured to have an increased 12MP sensor.  With the S95 reaching end of life as of the summer of 2011, you might just find a great deal on a wonderfully small camera capable of delivering excellent results. If you are willing to deal with Fleabay, you ca find very nice S90's around the $200 mark.

Have your own favourite "digital derringer"? Share your camera of choice with us!
Picture
Dusk in Downtown Vancouver - Canon S90

Photo Blog: Peggy's Cove II

11/3/2010

 
Picture
Jan's image of Peggy's Cove, Nova Scotia.  It was very windy the day we were there and while the clouds looked like they could produce rain at any time, it was surprisingly sunny most of the day.  Classic wooden lobster traps were strategically displayed on the wharf just north of Peggys Point Road.  The water seen here is the cove itself.

What Cruise Itinerary is the Most Photogenic?

9/1/2010

 
Picture
Panama Canal
Which cruise has given you the best photo opportunities?  We could be talking while on board your vessel or out on a shore excursion.  We are looking for your opinions of the best cruises for photographers to take and the best ports and excursions to book.  Let us know what inspired you creatively and where you made some of your best images!

In Praise of Simplicity - the Panasonic GF1

8/22/2010

 
Picture
Lumix GF1 and Lenses
Recently I made a business trip to Chicago where I knew I wouldn't have the space to carry my usual camera gear nor would I have sufficient free time to use the full kit that I carry.  In spite of this, I still wanted to have a camera (and a selection of lenses) capable of producing images I could sell for stock.  I decided that I would rely solely on a camera system I have just begun to use in a serious manner  - the small 12MP Panasonic EVIL camera, the GF1.

You're looking at 1.4kg of camera gear to the left.  With all the lenses.  With battery.  With viewfinder.  There are three zoom lenses that span 9 - 200mm.  As this is a micro four thirds camera, that's a range of 18 - 400mm on a full frame camera.  In addition, there is a 20mm (40mm full frame equivalent) f/1.7 for low light work.  By comparison, my Canon 5D MkII with battery grip and 24-105 lens weighs in at 2kg. The entire GF1 rig fits into my briefcase which also holds my netbook, cables and all the paperwork I need for my business meetings.

One evening when some colleagues, my wife and I had a few hours to ourselves we headed into downtown Chicago to walk the Magnificent Mile.  Happily it was approaching the magic hour as the sun disappeared behind the Chicago skycrapers and the street lights began to come on.  I was able to get a great shot of the Carbide and Carbon Building - now a Hard Rock Hotel - with the lit street lights in the foreground.  With the camera and the image stabilized 14 - 45 zoom only weighing 500 gms it was a breeze to hold steady even at very low shutter speeds.  I took a number of pictures in Millennium Park long after sunset and the hand held, unbraced shots taken at a 1/10 of a second were acceptably sharp. 

Using the LCD finder is quite easy.  Many have complained about the low resolution of the finder, its high cost and inability to render the entire dynamic range in a scene.  All of these are true, and while the first two may be addressed in future versions of the viewfinder (or by using the G2 or GH1 cameras instead), the last annoyance can be addressed by referring to the live histogram in the viewfinder.  The viewfinder will also tilt from its horizontal position through 90 degrees to vertical, making it a cinch to take low level shots simply by adjusting its position.

This is a camera that begs to be used to record RAW images.  I have never been overly happy with the way Panasonic has processed JPG images in camera and prefer to extract the most detail and color from the RAW files.  I have already had images accepted and sold on iStock, and since this is the measure of quality I use, I am quite happy with the RAW files that come out of this camera.
.

Picture
GF1 with 8mm Peleng Fisheye
An interesting feature of the camera is the availability of numerous adapters that let you use a variety of lens from other camera systems on the GF1.  This has let me use some rather interesting lenses in a new, digital way.  One of these lenses is my 8mm Peleng fish eye.   It gives the GF1 a rather exotic look and the end results are significantly wider and far more "fish eye-like" than the Olympic 9 - 18mm zoom lens.

Why use something so retro?  Isn't an DSLR like a Rebel or an EVIL camera with built in viewfinder a better thing?  Call me old school but I love the look and feel of the camera and appreciate that an entire camera system can be put in your pocket - or briefcase.  Are there performance and handling compromises in this camera - yes, just like every camera out there, but they are not insurmountable and give a slight quirkiness to the GF1.

<<Previous
Forward>>

    Dougall Photography


    [email protected]


    Follow Dougall_Photo on Twitter

    Blog Archives

    June 2018
    January 2018
    September 2014
    July 2014
    June 2014
    July 2013
    May 2013
    April 2013
    January 2013
    September 2012
    July 2012
    June 2012
    May 2012
    November 2011
    October 2011
    July 2011
    June 2011
    April 2011
    December 2010
    November 2010
    October 2010
    September 2010
    August 2010
    July 2010
    June 2010
    May 2010
    April 2010
    March 2010

    Blog Categories

    All
    Alaskan Ports
    Baltic Ports
    Canadian Ports
    Caribbean Ports
    Contests
    Cruise Reports
    Cruise Tips
    Guest Photo Blog
    New England Ports
    New York
    North Atlantic Ports
    Photo Blog
    Photography
    Ports
    Ships
    Shore Excursions
    Tiny Travel Tips

    RSS Feed

    View my profile on LinkedIn
Web Hosting by EasyCGI