Dusk or dawn is when I prefer to look for images to capture. This is the best light for many landscape photos when the light has a rich, warm tone to it and it glances across objects giving them body and texture. While I prefer to shoot during these “magic hours”, I often find myself out in the hot light of midday, packing camera gear from location to location like some kind of rented mule.

Golden Hour in Las Vegas
Dusk in Las Vegas: this is my ideal time to shoot – the sun has gone down but the sky is still light enough to render the shapes of buildings. Lights have come on and you have the best of both worlds – ambient light to tell you where you are and spectacular city lights to paint an evening picture.
Let’s face it; there are times you will find yourself visiting locations and tourist sites outside of the beautiful light of dusk and dawn. Too often I am standing under the blazing sun looking for the best angle to take a photo while trying to tame the bright highlights and inky deep shadows. As I work to create an image in these conditions, I try to draw on some of techniques I have used in the past when I shot film and now bring to my digital photography work.
Let’s face it; there are times you will find yourself visiting locations and tourist sites outside of the beautiful light of dusk and dawn. Too often I am standing under the blazing sun looking for the best angle to take a photo while trying to tame the bright highlights and inky deep shadows. As I work to create an image in these conditions, I try to draw on some of techniques I have used in the past when I shot film and now bring to my digital photography work.
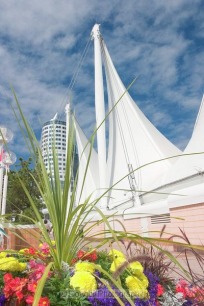
Canada Place, Vancouver
Pick a low angle: shooting on a bright day can be great if you keep a few simple things in mind, like shooting with your back to the sun to keep colors from washing out. We learned this one early as photographers – have Aunt Bess face the sun so that you get a clear image of her squinting myopically at you. We know now to put Aunt Bess in open shade to get a better image (although she may still squint at you), but it’s hard to move a building out of direct sun.
A sunny day produces great color, but can also throw some wicked shadows across the scene you are trying to capture. Shooting below eye level will sometimes hide the shadows so you don’t have to deal with them in postproduction. This image of the Pan Pacific Hotel in Vancouver was taken to show off the huge white “sails” set against the sky. By crouching down in front of a large pot of flowers I was able to hide the dark shadows cast by the pot and the low brick wall running along the walkway. Even without the motivation to hide shadows, shooting low often produces a more dramatic image than shooting at eye level.
A sunny day produces great color, but can also throw some wicked shadows across the scene you are trying to capture. Shooting below eye level will sometimes hide the shadows so you don’t have to deal with them in postproduction. This image of the Pan Pacific Hotel in Vancouver was taken to show off the huge white “sails” set against the sky. By crouching down in front of a large pot of flowers I was able to hide the dark shadows cast by the pot and the low brick wall running along the walkway. Even without the motivation to hide shadows, shooting low often produces a more dramatic image than shooting at eye level.
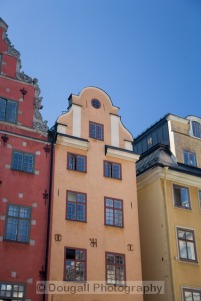
Gamla Stan, Stockholm
Find the shade: the shade can often be your friend of a bright day. If you are able to shoot in open shade where the sky is very bright but there is no direct sunlight on your subject, you can avoid the highlights and the shadows fighting with one another. These buildings in Gamla Stan, Stockholm were in open shade with a light blue sky and no shadows. A few minutes earlier, the sun was raking directly across the face of the houses creating dramatic and difficult to deal with shadows. Sometimes just sitting at a sidewalk café and having a coffee will give the sun time to move and give you a better chance at a useable image like this.

Danish Castle Wall
Look for textures: moving closer to a subject cures a lot of woes, from eliminating distractions to emphasizing texture and shape. A simple rule of photography – if your pictures lack impact, you aren’t close enough! This wall in Elsinore Castle, Denmark was being eradiated by a hot noon sun. Fortunately the light was striking the wall at a bit of an angle giving some definition to the brick.
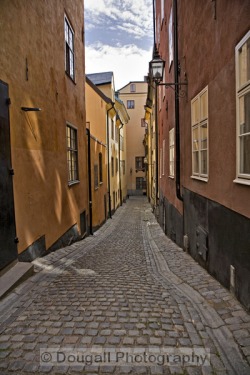
Gamla Stan, Stockholm
Fight the shadows: you can also take the more stubborn approach to midday light and just pull the detail out of the shadows and highlights in postproduction. While I would love to set up a tripod and do a proper HDR rendition of a scene, I don’t carry one as much as I used to. Instead, I have been known to utilize Photoshop to temper the extreme dynamic range of a photo. This is no magic bullet solution as opening up shadows can inject ugly noise as the program tries to invent details. Highlights lacking any detail just turn a dull gray if you try to tone them down and literally add nothing to the photo. Adjustments need to be subtle and can enhance a properly exposed image, not save a badly exposed one.
This quiet street in Gamla Stan, Stockholm had a hot white sky peeking between the builings and dark cobblestones below. I used a fake HDR technique where I created an additional light and dark version of the single image to open up the shadows and darken the sky respectively. I then blended the three images in Photoshop with this image being the result. I am still going to replace the sky at some point as there is not enough detail there for my liking, but as a stock image it sells just the way it is.
This quiet street in Gamla Stan, Stockholm had a hot white sky peeking between the builings and dark cobblestones below. I used a fake HDR technique where I created an additional light and dark version of the single image to open up the shadows and darken the sky respectively. I then blended the three images in Photoshop with this image being the result. I am still going to replace the sky at some point as there is not enough detail there for my liking, but as a stock image it sells just the way it is.
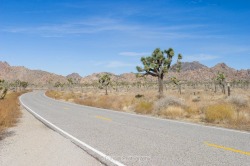
Joshua Tree National Park
In camera corrections: what you can correct in your camera is far better than any postprocessing used to salvage an image later. Most landscape photographers carry two filters with them – a polarizing and a graduated filter. A polarizing filter displays its strongest effect when used at right angles to the sun. When shooting with a wide angle lens where a great deal of sky is visible, part of sky is often quite dark, with the effect tapering off on each side.
For a more consistent effect I prefer a light blue graduated filter. It creates a constant effect across the entire image regardless of where the sun is. It also lets me control the bright white of the clouds and helps prevent the detail from disappearing. With the clouds toned down, it is usually possible to render the entire image within the dynamic range of my camera.
Creating images during the day is just a rewarding as at other times. We need to understand where the shadows fall and how bright the highlights are. If I can only control for one of these, I fall back on my “old school” photography skills when I shot slide film: expose for the highlights and let the shadows fall where they may.
We will be exploring these and other ways to take stunning photos in broad daylight on our next cruise and photo seminar on May 13, 2011. You can learn more about our seminar here.

 RSS Feed
