Dougall Photography
  • Home
  • Stock Photography
  • Tips and Trips
  • Photos

iPhone Photos - North Atlantic Cruise

11/6/2011

 
Picture
Sod Houses, Iceland
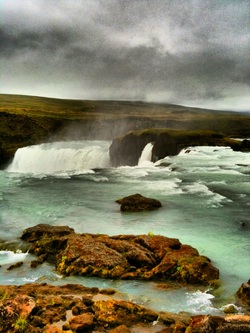
We have finally posted some of our images from our last cruise through the North Atlantic.  This gallery is a bit different though as all images were shot on an iPhone 3GS and processed using iPhone apps while in the field.  While we have far more images using the big cameras, we thought these turned out well and are fun to look at. 

For those interested in what iPhone apps we used here is our short list:

Procamera
Pro HDR
Dynamic Light
finarXImage
PhotoForge2
Pic Grunger
Paper Camera

I treat iPhone photography much like using a toy or  LOMO camera.  I have come to embrace the grain, the saturated colors and the ghosting in HDR photos.  The quality of the images will never rival a DSLR, but these pictures sure and fun to take and process!

North Atlantic Cruise - 27 Days At Sea

10/15/2011

 
Goðafoss Falls, Iceland
Yep, 27 days at sea from Southampton, UK to Quebec City via New York!  This was really two cruises in one - a seventeen day crossing to New York and then a ten day cruise along the eastern seaboard to Quebec City - all on Crown Princess and all in the same cabin.  It wasn't as claustrophobic as you might expect - we had a cabin with balcony so that on the days when it was warm enough we had extra room to use.

The weather?  Well, temperatures ranged from around 20C in England and Canada to 3C in Greenland.  We thought we had brought a range of clothes to wear but we still wound up buying extra along the way just to stay warm!

Was the sea ever rough?  In a word - yes.  Ever wonder where the hurricanes that rip up the east coast of North America go when they finally say goodbye to Newfoundland?  Yep, right into the North Atlantic.  We missed one stop in Greenland because it was too windy, foggy and icy to make harbour.  We missed another stop later in Newfoundland because of hurricane strength winds between Halifax and Sydney, Nova Scotia. Don't even talk to me about the weather as we left Akureyri, Iceland bound for Reykjavik via the Denmark Strait!

Was it the best cruise we have taken?  It rates right up there as one of the best.  While you are on a great white cruise ship with all the comforts, it is still adventure sailing on a route like this.  Ports were missed, other ports we arrived at late and the weather made sailors out of all who were on board, but the stops we did make in Shetland, the Faroe Islands, Iceland and Greenland were beautifully fascinating and worth the effort to get to.

Watch this space as we share more about the trip and some of our experiences along the way!

Still Searching For The Right Camera Strap?

7/15/2011

 
Picture
Nikon Advertisements
If you use a compact camera, chances are you don't agonize over choosing the best neck strap for your camera.  You install the one that came with the kit and you are good to go.  The same choice is not always so simple with big, black SLRs.  Not only are the cameras large, but with battery grip and telephoto lens, quite heavy indeed. 

Most camera makers do give you a neck strap as part of the entry price into your new camera, but they spend more time designing the placement of their logo rather than ensuring you have a comfortable fit.  These straps usually consist of a black nylon or canvas strap with hard edges and little "give" or flex to the material. 

Back in the day, the straps were even worse as they were made of very thin nylon webbing with a movable (always in the wrong place) rubber shoulder pad. Thankfully, there a better choices today!


Picture
Canon F1n with leather strap
Camera straps are a lot like camera bags - some photographers are always on the search for the perfect one.  In my ongoing search for the perfect camera strap I look for certain characteristics: softness, flexibility, "give" in the strap that allows it to stretch under load, a quick release mechanism to remove the strap, and metal hardware for long wear (I keep my straps for years and move them from camera to camera). 

Years ago I gave up on manufacturers' straps and vowed that I would not provide free advertising of my cameras to potential thieves.  I began replacing my uncomfortable corporate neck straps with wide, soft leather "field straps" made by Globus Inc, a company that doesn't seem to be around any more.  These straps came in brown or black, had a wide, soft  neck pad, gave a little when slung around the neck and had metal hardware.  I purchased a number of these in the late 70's and still use them today on some of my cameras.  The only downside is that they are made of such soft leather they don't stay on my shoulder.  I have developed a habit of holding the strap part way up and pressing it against my body to hold it in place.  I have done this for so long that I don't even notice anymore and the camera never moves as I walk.

Picture
E-1 hand strap and Lowe-Pro neck strap
More recently I have been using Lowe-pro neoprene straps (model 2070910)  that have many of the same characteristics as my beloved leather ones.  Again, these are soft straps with the natural give in them to allows for flexing and stretching when under a heavy load.  They have metal hardware and a separate piece of strapping that attaches between the camera and the neck strap.  The strap itself is then connected by quick release rings making it easy to detach the strap for storage or when it's not needed.  The neoprene neck pad has small "nubbies" on the underside that keep the strap in place on my shoulder.

When wouldn't I need a neck strap?  When using a hand strap of course!  I attach a Canon E-1 hand strap to all my cameras and then hook the neck strap to the E-1.  When I am carrying a long telephoto for an extended period of time it is far easier to hang the camera and lens off of my hand rather than my neck.  When I am doing this, I remove the neck strap (via the quick release) so it doesn't drag on the ground.

As the Lowe-pro strap has now been replaced with newer versions that are not as flexible for my liking, the new Custom SLR Split Camera Strap from B&H Photo may be a good replacement as it appears to be flexible, non-slip and complete with a removable neck pad. 

If you're finding that your neck strap won't accommodate the weight of your camera and lens or it just isn't flexible enough, begin your hunt for the world's best camera neck strap (or hand strap) - it may just make it easier to carry your camera more comfortably for longer periods of time.

10 Tips for Taking Better Photographs From a Tour Bus

7/3/2011

 
Picture
Catedral Metropolitan, Panama City, Panama
In spite of the fact that they are a integral part of many cruise excursions, I hate tour buses.  They are often cramped, crowded and hot - and there is grubby glass between the locale and me and my camera. The lack of space means that it's difficult just to extract my camera from its case let alone swing it around to take a photo through the bus window.  Often the bus blows by interesting landmarks with only a brief acknowledgement of what we are seeing let alone treat us an actual stop. 

To improve you chances of getting a good photo from a tour bus, try one or more of the following techniques:

  1. Use a digital derringer: with very little room to move, a compact camera is easy to remove from a case and hold up to the window to use.
  2. Use a small lens on your digital SLR: if you only have your big black camera, try to use a short lens so that you don't bang your gear against the window glass. A small, inexpensive prime lens like a 50mm f/1.8 will serve you well in these situations.
  3. Use a flexible rubber lens hood: this will reduce or remove any reflections that you usually get when shooting through glass by placing the hood directly on the bus window.  The above photo of Catedral Metropolitan in Panama City, Panama was taken through a bus window.  I had no lens hood but was lucky enough to get this shot with only some reflection - can you see it?  With a flexible hood, you can shoot from an angle and still have the hood completely touching the glass and preventing a reflection
  4. Use a rigid circular lens hood: while losing the flexibility, even a rigid lens hood is better than none at all.  On my Leica X1 I use a black metal lens hood from a 90mm f/2.5 M lens that sticks out beyond the front of the lens.  I can then press the hood directly again the glass window and eliminate any reflection.  
  5. Use a high shuttle speed: with scenery flying by the bus, you are going to want to freeze those moving trees, so pick a speed above 1/500 if possible or, if your prefer something more automatic, select an action or sport setting.
  6. Turn off your flash: "blow back" off of your flash onto a close piece of glass is not a good thing.  You will get a huge amount of glare and will washout the image you were trying to photograph.
  7. Turn up your ISO: some tour bus glass can be tinted - really tinted.  You may find that there isn't enough light to get a decent photo using the recommended high shutter speed.  If you camera isn't set to auto ISO, you may need to run up your ISO to 400 or more.
  8. Focus manually:  the auto focus on some cameras don't like having glass too close to them.  You may need to use manual focus (often set to infinity) so that your camera doesn't "hunt" for focus.
  9. Sit a little further back on the bus: you can often see the "best bits" approaching the window if you are a bit further back.  That way you won't be surprised as the scenery flies by!  Pay attention to the side pillars of the bus that separate the windows - some seats will place you right  beside these making it difficult to shoot around.
  10. Eschew to bus all together:  the simplest solution is not to get on the bus!  Look for walking tours that are often more photographer friendly due to their slower pace.  You can also look for tours where the bus is only a means of transportation to the real sightseeing rather than being the tour itself.
Picture
Lens Hood or No Lenshood?
While not all lenses work well with generic rubber lens hoods.  The 50mm lens in the bottom right is perfect to pair with a hood.  Zoom lenses, like the ones in the back row,  can be fitted with hoods, but make sure you don't get any vignetting at their widest settings.  Other lenses like the fish eye in the lower left don't accept any kind of lens hood - and have a front element that sticks out - so avoid placing it up against any glass!

Photo Blog: Air Snipe in Ketchikan, Alaska

7/1/2011

 
Picture
Air Snipe. Ketchikan, Alaska
Tongass Narrows is the channel that runs from Mud Bay in the northwest to Dairy in the south east and is the approach your cruise ship will use to arrive in Ketchikan.  There are great photo opportunities along the way as lumber yards, picturesque cabins and derelict boats dot the narrow waterway.

We were approaching from the north and as we neared town we passed by this very handsome motor vessel named "Air Snipe".  It looked for all the world like it could once have been a military vessel of some sort so once we arrived back home I did a little digging.  This vessel had her keel laid down in December 1942 as submarine chaser SC-1068.  In 1946 she was transferred to the US Coast Guard as USCGC Air Snipe and in 1948 was sold to Boyer Towing in Ketchikan, Alaska as a towing vessel. 

This is just one example of the interesting sights that can be seen during the run in to Ketchikan along the Tongass Narrows.

What's My (Camera) Bag?

6/30/2011

 
Picture
Think Tank Urban Disguise 40
Photographers spend a great deal of time looking for the perfect camera bag hoping it's available on the next trip to the store.  Every bag is a compromise unless you have found one that folds the space-time continuum in such a way that a small bag holds a lot of gear and all of it doesn't weigh very much.  Sadly, I haven't seen that bag available at my local camera store, so I have had to make some sacrifices and select a bag that obeys the laws of physics.

One of my first camera bags for my digital camera equipment was the Bob Krist Travel Bag sold by L.L. Bean.  It had the distinct advantage of being taller than wide, thus allowing for a full size camera with a mounted long telephoto to be dropped into it.  At 14" X 12" X 5" and with a vertical configuration, it always felt a little awkward to carry.  While it had some endearing features including the ability to transform into a backpack, after a couple of years I was back to looking for a different bag.

The other bag I have used is the oddly named Crumpler Geekstar that had a unique lower horizontal compartment for storing lenses.  It also looked for all the world like a large, royal blue diaper bag but ultimately, like the Bob Krist bag, proved to be too large and cumbersome to easily carry around.

Today my over the shoulder travel camera bag is a ThinkTank Urban Disguise 40.  Into this 13" X 10" X 4" black ballistic nylon bag goes as much gear as I would normally want to carry.  Typically I put a Canon 5D Mk II body with grip and separate 70-200 f/2.8, 24-105 f/4, 2X extender and a digital derringer of some sort.  Without the grip on my 5D, I usually store the camera with a mounted 16-35 in the middle compartment, a 70-200 f/2.8 on one side and a 300 f/4 on the other.  Again, this still leaves room for a digital derringer to be stored in the central compartment giving me more than enough equipment for almost any circumstance.

As with most other camera bags, the inside can be configured in many different ways by attaching various partitions and platforms using hook and loop attachments.  The folks at Think Tank provide a huge selection of these partitions with the bag so there is no shortage of ways to configure the inside.

The rear zippered compartment holds my netbook and power cable.  The two expandable front pockets can hold portable hard drives, small prime lenses or an external flash.  This still leaves another zippered compartment between the main one and the front pockets.  Here there are pockets for pens, paper, lens cleaner and cloth as well as a "Pocket Rocket" - a folding wallet that will hold CF and SD cards and clips to an lanyard mounted in the bag for security.  Soft, stretchable outside pockets on each end of the bag allow for water bottles or the like to be stored where they can be easily accessed.

It's really the little extras that set this bag apart and shows that photographers were involved in the design and testing of this product.  While most bag hardware is now made of plastic, all clips, rings and zipper pulls on this bag are of metal to stand up to the most severe wear and tear.  The zippers are weather resistant and the bag comes with its own rain jacket that can be installed over the bag on rainy days.  There is an open pocket on the back of the bag that can be used to hold paperwork or, with the bottom portion open, it becomes a sleeve that will fit over the upright handle of a rolling suitcase. 

The adjustable, curved and well padded shoulder strap makes this bag relatively easy to carry even when loaded to the max with gear.  The zippers are lockable with any luggage lock you would care to use.  Most importantly, this bag is airplane friendly and will fit under the seats or in the overhead bin on the tiny CRJ's that fly in and out of Saskatoon.

As the name of the bag implies, it is meant to be non-descript rather than shouting out that it's filled with expensive cameras.  Short of carrying around a converted diaper bag to discourage thieves (I've done that,  by the way), this bag will limit unwanted attention during your travels.

The best indication that a bag works is how long a photographer uses it and this one has been my primary travel bag for four or five years now.  The bag still looks great - as the photo above will attest - and is large and flexible enough to carry all manner of camera gear.  If you are still looking for that perfect bag, this one - or another in the Think Tank lineup may be in order.

My Digital Derringer

6/27/2011

 
Picture
Canon S90
A "digital derringer" is a small camera that is easy to carry in your pocket with the controls and image quality that comes close to a digital SLR.  This is the Holy Grail for many photographers (besides the perfect camera bag); a small camera with big camera image quality. 

I bring my small camera along when my Canon 5DMkII would just be overkill.  On cruises it's what I carry during a day devoted to shopping or an evening out in restaurants where I don't want to be encumbered with a lot of gear.  I use it extensively in the confined space of a tour bus or small boat where there isn't the "swinging room" to pull out a larger camera.  I also carry it discretely in places where an expensive DSLR might draw unwanted (and criminal) attention.

The Canon S90 (now replaced by the similar S95) has been with me for a number of years, and at 4" X 2" X 1", it goes a long way to addressing the small camera/big quality balance.  It is a 10PM camera that is small and light enough to drop into a pocket yet has big camera features. It's 28-105 (35mm equivalent) lens is a fast f/2.0 at the wide end and a respectable f/4.9 at the telephoto end.  In addition, the lens is also image stabilized which gives me even more of an edge at reducing camera shake.

The camera has several other features that I always look for - the ability to shoot RAW images and a usable histogram to review exposure information.   RAW images tend to give a little more exposure latitude and allow for final processing under my control rather than relying on the camera to do the work.  The histogram gives me a better indication of whether an image is properly exposed rather than relying on the inaccurate thumbnail that appears on the camera's LCD screen.  For me, without these two features, a camera really is little more than a toy.

There is a full range of manual and semi-automatic controls, allowing for Aperture or Shutter priority, full manual, Program, Auto, and Custom as well as movie mode and eighteen - count them - eighteen special scene modes (including the ever popular aquarium mode).  Also, when shooting JPGs, there are 10 white balance setting available to you.

The movie mode is only 640X480 @ 30fps (the current S95 has 780p HD movie mode) but it still turns in very acceptable movies that don't take up much room on the camera's memory card.

Probably the feature that is most useful on the S90 is the control ring around the front lens mount.  This ring provides for easily accessed, customized control that just isn't found on many cameras.  I can decide if the ring will remain with its default use, (which changes based on exposure mode) or for zoom control, white balance adjustment, exposure compensation or ISO selection.  For those of us who grew up with analogue cameras, this is a great way to easily access one more set of controls that might otherwise be buried in a menu somewhere.

Are there any downsides to this camera?  Sure, there isn't an optical viewfinder,and I don't believe that the most stable way to take a photograph is to hold your camera at arm's length from your face!   The zoom range is also limited if you are doing anything more than general family, or holiday snaps.  At 28mm it is wide enough for most needs but at the telephoto end, 105mm (equivalent) is only 2X magnification - hardly enough to bring in that whale if you are encountering wildlife in Alaska. For this, you are going to need something like the Canon SX30 with a telephoto reach of 840mm!  While this camera costs not much more than the S95 does today, it is much larger.

The S90 has long been replaced by the S95 with only a few significant changes including the inclusion of 780P video and in-camera HDR capability.  It too, is soon to be replaced by the S100 rumoured to have an increased 12MP sensor.  With the S95 reaching end of life as of the summer of 2011, you might just find a great deal on a wonderfully small camera capable of delivering excellent results. If you are willing to deal with Fleabay, you ca find very nice S90's around the $200 mark.

Have your own favourite "digital derringer"? Share your camera of choice with us!
Picture
Dusk in Downtown Vancouver - Canon S90

Photo Blog: Back to Vancouver

6/25/2011

 
Picture
Early Morning in Vancouver
May 20, 2011 - We slipped under the Lions Gate Bridge very early in the morning and were tied up along side Canada Place by 7:00am.  The weather was gorgeous with clear skies and the promise of warm temperatures.  It is amazing how quickly seven days pass on a cruise ship.  We had great weather, wonderful workshop participants and a crew that really looked after all of our needs.  While Jan and I took no ship excursions and simply prowled around our own, we came back to land feeling refreshed and relaxed.  We are now looking into a northbound cruise sometime in 2012.

Photo Blog: Canadian Inside Passage

6/25/2011

 
Picture
Queen Charlotte Strait Scenery
May 19, 2011 - Cruise ships that end their voyages in Vancouver usually travel south through the protected waters between mainland British Columbia and Vancouver Island on their last sea day.  About noon our ship passed into Queen Charlotte Strait which begins at the northern tip of Vancouver Island.  We sailed south through progressively narrower channels until sunset near Campbell River. 

The photograph above shows the scenery early in the afternoon while below is the1898 Cape Mudge Lighthouse at dusk.  This lighthouse protects the entrance to Seymour Narrows, the location of the once treacherous "Ripple Rock" which claimed 120 vessels before being blown to bits in 1958 by the largest non-nuclear explosion at the time.
Picture
Cape Mudge Lighthouse

Photo Blog: Ketchikan, Alaska

6/25/2011

 
Picture
Creek Street, Ketchikan
May 18, 2011 - Our stop in Ketchikan was the only day we really saw any rain on our entire cruise.  We had anticipated cold, wet weather this early in the year but were treated to warm and sunny instead.  It was heavily overcast with light rain as we docked but the rain ended and we remained dry during our entire visit.  Once again, having taken in many of the sights in Ketchikan previously, Jan and I explored on our own. 

We walked through Tongass Trading Post right on the pier.  This is one of three stores, all located in downtown Ketchikan, with the whimsical names of "Tongass 1", "Tongass 2" and "Tongass 3".  The store on the pier is filled with souvenirs, hardware goods and a small confectionery.  Many cruise passengers make this their last stop on the way back to the ship as the souvenirs are reasonably priced, an extra suitcase can be bought cheap and the bottled water, pop and snacks are better priced than on board.

Downtown Ketchikan is compact enough that it is very easy to walk around.  There are probably more jewellery stores per city block here than in any other Alaskan port, but if you manage to walk through town without being distracted, you will soon come to Creek Street, the former red light district built on pilings above the water.  This is now the location of restaurants and boutiques in probably one of the prettiest settings in Alaska.  The green house to the right is Dolly's House Museum, a throwback to the time when there were numerous "establishments of negotiable affection" along the boardwalk.
Picture
Ketchikan Crossing Guard
It's funny that in a town of only 15 000 residents there are crossing guards at many downtown crosswalks.  I'm still not certain if this casts aspersions on local drivers or visiting cruise ship passengers, but the help was always appreciated!
<<Previous
Forward>>

    Dougall Photography


    [email protected]


    Follow Dougall_Photo on Twitter

    Blog Archives

    June 2018
    January 2018
    September 2014
    July 2014
    June 2014
    July 2013
    May 2013
    April 2013
    January 2013
    September 2012
    July 2012
    June 2012
    May 2012
    November 2011
    October 2011
    July 2011
    June 2011
    April 2011
    December 2010
    November 2010
    October 2010
    September 2010
    August 2010
    July 2010
    June 2010
    May 2010
    April 2010
    March 2010

    Blog Categories

    All
    Alaskan Ports
    Baltic Ports
    Canadian Ports
    Caribbean Ports
    Contests
    Cruise Reports
    Cruise Tips
    Guest Photo Blog
    New England Ports
    New York
    North Atlantic Ports
    Photo Blog
    Photography
    Ports
    Ships
    Shore Excursions
    Tiny Travel Tips

    RSS Feed

    View my profile on LinkedIn
Web Hosting by EasyCGI